
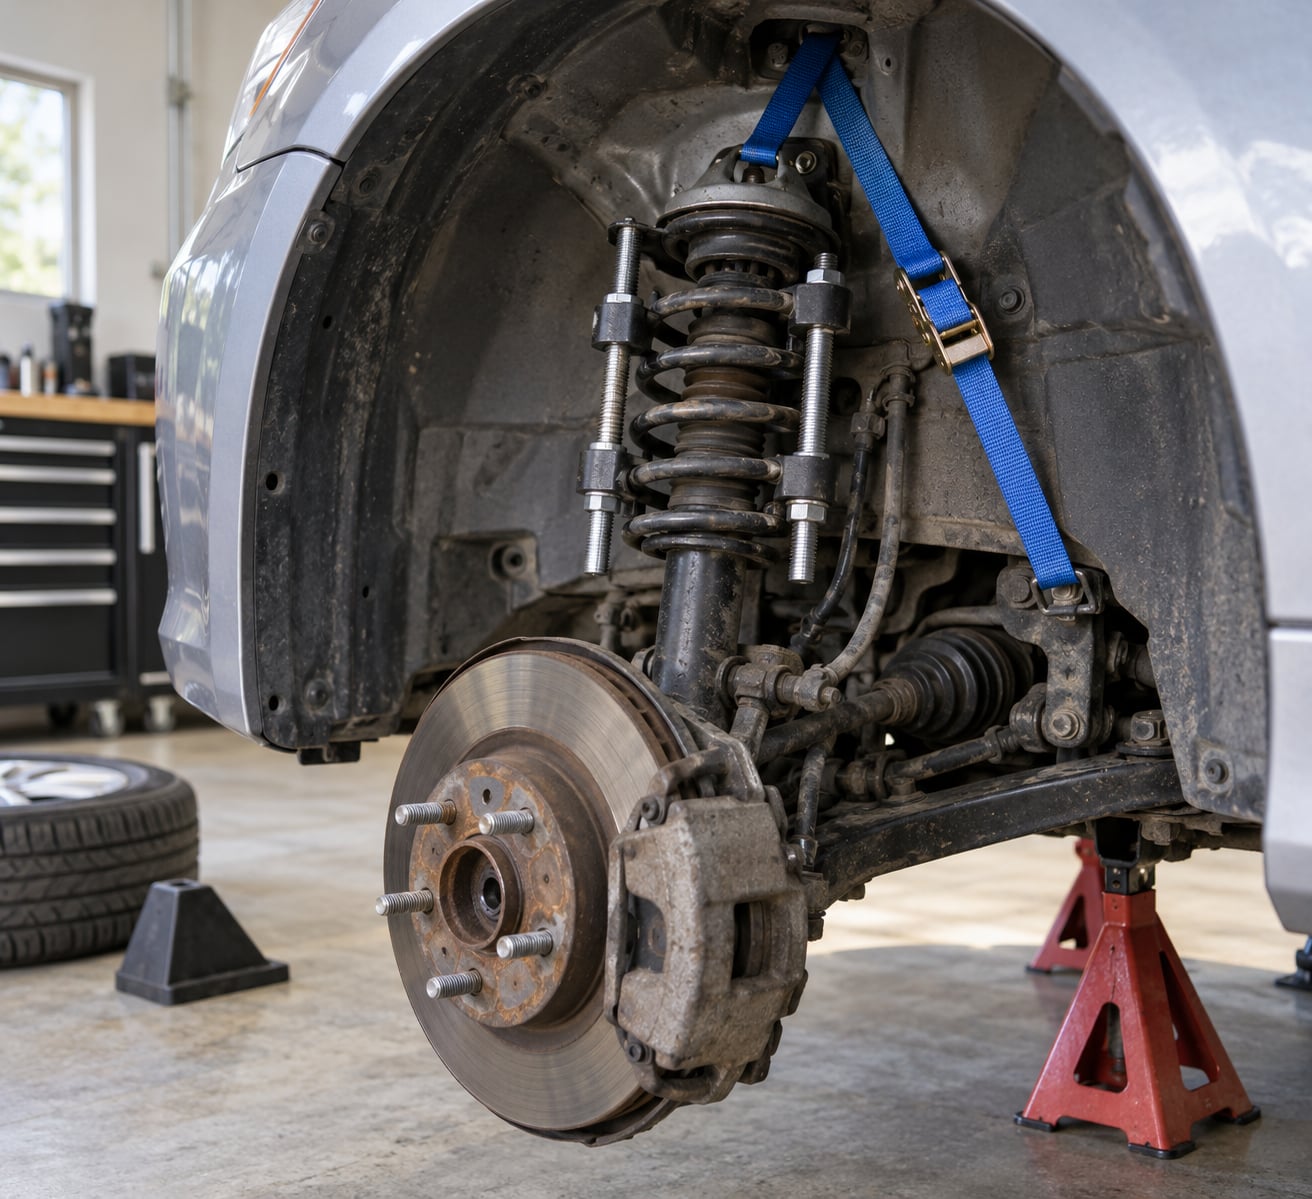
Yes, you can replace a coil spring yourself on most cars, and learning how to replace a coil spring safely takes a few hours once you have a spring compressor. The catch is the stored energy: a compressed coil spring can throw itself clear of the tool and hit you hard enough to hurt. Support the vehicle on rated jack stands, tether every compressed spring, and never work under a car held up by a jack alone.
The bigger fork in the road is what your suspension actually uses. Some cars run a standalone coil spring sitting on a lower seat and under an upper perch. Others use a loaded strut assembly where the spring is pre-mounted on the cartridge, and on those you replace the whole assembly rather than separating the spring. Work out which one you have before you buy anything.
Safety first, before anything else: a coil spring under compression stores several times the vehicle’s corner weight, and a hook that pops loose turns that energy into a steel club. One experienced member on CorvetteForum put it plainly: they have about a thousand pounds of load in them, and a buddy’s shop ended up with a hole punched through a concrete block wall when one got loose.
That is the whole reason this guide is written the way it is. Every step below assumes you are on a level surface, on stands rated for the vehicle, working slowly, and treating the compressor like loaded equipment rather than a hand tool.
Table of Contents
- What You Need
- Step-by-Step: How to Replace a Coil Spring Safely
- 1. Confirm Whether You Are Replacing a Spring or a Complete Assembly
- 2. Inspect the Suspension and Record the Current Ride Height
- 3. Prepare the Vehicle and Work Area
- 4. Remove the Old Coil Spring or Strut Assembly
- 5. Inspect and Replace Supporting Components
- 6. Install the New Spring and Refit the Suspension
- 7. Check Alignment, Ride Height, and Wheel Clearance
- 8. Perform a Final Safety and Road Check
- Common Mistakes
- Frequently Asked Questions
- Can I replace just one coil spring on my car?
- Should coil springs always be replaced in pairs?
- Do I need a wheel alignment after replacing a coil spring?
- How do I know which way a new coil spring should face?
- Can I replace a coil spring myself at home?
- What should I do if a suspension fastener will not break loose?
- Conclusion
What You Need
The tool list is short. The one item most people are missing, or are borrowing, is the spring compressor itself, and that is the piece that decides whether this job is safe or reckless.
| Tool | What it does here | Essential or nice-to-have |
|---|---|---|
| Floor jack | Lifts the corner just high enough to fit stands and clear the tire | Essential |
| Rated jack stands | Carry the vehicle once the jack is lowered. Match the stand rating to the vehicle weight | Essential |
| Wheel chocks | Stop the vehicle rolling while it is lifted | Essential |
| Spring compressor | Compresses the coil so the perch clears and the spring can come out | Essential |
| Torque wrench | Puts the strut mount and lower fasteners at factory torque, not just tight | Essential |
| Ball-joint separator | Frees the knuckle from the control arm on strut setups | Essential on strut cars |
| Socket set, ratchet, extensions, pry bar | The usual removal work | Essential |
| Ratchet strap or hose clamps | Tethers the compressed spring to the frame or tower | Essential |
| Flashlight and creeper | You will be looking up into a tower with your hands | Nice-to-have |
| Alignment equipment or a shop visit | Changes to strut angle or spring position throw alignment out | Essential after the job |
Get the vehicle-specific service information before you start. The manual tells you whether the spring is a separate part or a welded assembly, the torque figures for the strut mount bolts, and the specified ride height. Guessing at any of those is how people end up with a wheel that rubs or a mount that groans.
Renting versus buying the compressor comes up constantly, and the honest answer is that for a one-off job, rent it. Auto parts stores and tool rental outfits stock them, and a two-hour rental beats committing to a bench-mounted unit you will use once. If you plan to do springs again, buy a portable two-piece threaded-rod model with safety catches. Our guide to replacing struts yourself covers the rest of the strut job in more depth.
Some jobs are better handed over. Air suspension needs its own diagnostic steps and a bladder replacement is not a spring job. Seized ball joints, structural rust around the tower or control arm, and a vehicle with no sound lifting point all belong in a shop. So does a spring that has broken and dropped the corner onto the tire until the tire is destroyed.
Step-by-Step: How to Replace a Coil Spring Safely
1. Confirm Whether You Are Replacing a Spring or a Complete Assembly
Look at the service information for your VIN, not a generic guide. A standalone spring sits by itself on a lower seat with a separate upper perch. A loaded strut arrives from the factory with the spring already clamped on the cartridge and the top mount attached, and the two are not separated on the car.
You can tell by looking: if the center of the spring goes straight down into a dark hole where the piston rod enters, it is a loaded strut assembly. If the center of the coil is open all the way through to the control arm, it is a standalone spring on its own seat.
This decides your parts, your procedure, and how much of the corner comes apart. Compression methods and fastener order differ between the two, and borrowing the wrong sequence is how people strip the lower control arm.
2. Inspect the Suspension and Record the Current Ride Height
Before touching a fastener, find out whether the spring is actually your problem. A broken spring shows as a clunk over bumps, a tire rubbing the fender liner, a visibly tilted car at a parking lot line, or a gap where a tire sits on bare rim. A fatigued spring usually shows as one corner sitting noticeably lower than the other three with no noise at all.
Measure and write down the fender-to-tire gap and the distance from the tire to the arch on both sides before you start. After the job you compare, and a corner that ends up higher or lower than it started tells you the perch or seat is not seated correctly.
Check the replacement part against the VIN, the position on the vehicle, and the original specification. Spring rate and free length have to match what came out. Note the color and any ID stamp on the old spring, since the paint code often identifies the rate and a mismatched code is a warning sign.
3. Prepare the Vehicle and Work Area
Work on level, hard ground where the stands can seat fully. Set the parking brake and chock the wheels that stay on the ground. Position the jack under the factory lifting point, not under the control arm or spring perch, which will bend.
Raise the corner until the tire clears, then set the stands and lower the jack until the vehicle’s weight is on the stands. The jack stays as a backup only. It is a mistake to leave the jack carrying load while you work, and it is the mistake with the worst possible outcome.
Disconnect the battery negative cable if the service procedure calls for it, since strut work often requires moving the wheel with the transmission in gear. Then remove the wheel. If your model uses locking wheel bolts, find the key or the impact socket for those before the car is up.
4. Remove the Old Coil Spring or Strut Assembly
Work from the top down. On a strut car, unbolt the strut mount bolts from inside the engine bay or wheel well and support the strut as the last bolt comes out, because it is about to swing free. Move any brake line, ABS wire, or sway bar link out of the way and support it rather than letting it hang.
Release the lower fastener, then separate the ball joint from the control arm with the separator. Do not pry hard on the ball joint stud; a bent stud means replacing the joint anyway.
Fit the compressor and tighten it gradually in small increments, alternating between the two rods so the load stays even. Once the spring is compressed enough for the perch to clear, take the upper perch or mount off and lift the spring straight out. On a loaded strut, the whole assembly comes out as one unit.
Two warnings here. Do not strike a loaded spring with a hammer to shock it loose, because the coil ends are hardened and will chip into a blade. And do not let the control arm take the full weight of the corner once the joint is free, since that is exactly the load it was never designed to carry.
Older vehicles often hide seized fasteners. If you are working on lines and hoses on an older car, expect the same corrosion pattern around the strut fasteners and budget penetrating oil and time.
5. Inspect and Replace Supporting Components
With the spring out, look at everything that was hiding under it. Check the upper mount and its bearing for rust or cracking, the bump stop for chunks missing out of the rubber, and the dust boot for a split that has let water in. A greasy or gritty bearing feels rough when you spin it.
Check the lower spring seat where the coil landed. This is the part that actually wears: pitting and flaking on a front lower seat is common, and a seat with deep pitting will cut into the new spring. Inspect the ball joint boot for a torn or greasy boot, and check the fastener boots for cracking.
Replace anything cracked, rusted through, or missing material. The spring seat and perch are the two items that turn a spring job into a repeat job, and if you are already in there, replacing a perished mount bearing or bump stop costs little extra. Control arm bushings fall in the same category.
For a vehicle where a nearby hub or bearing job is also due, it makes sense to combine the work rather than have the corner apart twice. Our wheel bearing replacement guide covers that side of the corner.
6. Install the New Spring and Refit the Suspension
Orientation is the first thing to nail down. The tapered or closed end of the coil faces the spring seat, and the end with the closer pitch faces the perch. Mark the old spring with tape before it comes out, and match it to the new one. A spring installed backward looks almost right and drives a tire into the fender liner within a month.
Fit the compressor again, install the lower seat if you replaced it, and set the new spring into position with the compressor still under tension. If the bottom end will not line up with the perch, a ratchet strap around the spring and the perch is the standard way to pull it over. Start the strut bolts by hand on a loaded assembly so it cannot drop while you align the holes.
Lower the compressor slowly and evenly until the spring is fully seated and both perches are making contact. Then torque to the manufacturer’s figure in the specified sequence, which on many cars is a criss-cross pattern around the upper mount rather than a simple circle. If the car sits on its own weight, the rubber-bushed fasteners get an alignment-and-tighten pass afterward.
7. Check Alignment, Ride Height, and Wheel Clearance
Install the wheel and compare your before measurements. The fender gap on the repaired corner should match the opposite corner, and there should be clear space between the tire and the inner fender liner all the way around with the suspension at normal ride height. Pull the steering both directions and watch for contact.
Check that the spring is sitting evenly on the seat all the way around rather than sitting on the edge of one coil. A spring perched on a coil end is the cause of most post-job clunks.
Arrange a wheel alignment whenever the strut angle, the spring position, or any suspension geometry may have changed. Changing a spring alters where the strut sits relative to the knuckle, and even new fasteners settling in can shift the reading. On a strut car with adjustable camber, it is not optional.
8. Perform a Final Safety and Road Check
Before the car moves, recheck every fastener you touched against the torque list, including the ones you installed while the suspension was hanging. Confirm the brake hose and ABS wiring are reconnected and not stretched or pinched, that no tools are left in the wheel well, and that the wheel turns freely with no rubbing.
With the vehicle on the ground, bounce each corner firmly a few times and listen. A clunk that disappears usually means the perch or seat is not fully engaged. A continuous creak over bumps usually points to a fastener not yet torqued or a bump stop left out.
Take the first drive slowly, in a quiet area at low speed, and stay alert for a pull to one side, a steering wheel that no longer centers, or a rumble from the front. Stop immediately if the car feels vague, if the tire rubs, or if you hear a metallic knock that follows every bump. Recheck the corner rather than driving it further.
Common Mistakes
Most of these come from rushing one specific part of the job.
- Wrong spring for the VIN. Match the part number, then confirm the paint or ID code against the old spring. A different rate changes handling and ride height.
- Spring installed backward. Match the taper and pitch to the old spring before you compress anything.
- Original orientation never recorded. Mark the old spring with tape and marker before removal, since several coils can look identical in a well-lit wheel well.
- Using an impact gun on the compressor. The force can jerk the hooks loose. Supreme Suspensions strongly recommends against it for exactly that reason, and the tool is not designed for impact loads.
- Working under a jack-only vehicle. Jack stands, rated for the vehicle, at a factory lifting point. Every time.
- Compressing past what the hooks can hold. Tighten in small increments and watch the hooks. Replace any compressor with bent hooks, and fit the safety catches where the tool has them.
- Overtightening the strut mount. The top mount is aluminum and strips easily. Torque to spec with a wrench, not a breaker bar leaning on the weight of your body.
- Tightening rubber-bushed fasteners with the suspension hanging. The bushing rotates under load, so the torque you feel is not the torque on the joint. Do it with the car at ride height.
- Skipping the alignment. If the strut angle moved at all, the tire wear starts now, not later.
One more worth naming: no tether. A ratchet strap, a hose clamp, or a length of chain around the spring and the tower takes seconds and is the difference between a spring that stays put and one that finds your head. Experienced technicians on the Corvette forums also point out that a lot of these jobs go faster with no compressor at all, using a floor jack under the control arm, the ball joint popped, and a shock absorber or a length of rebar down the middle of the spring as a keeper. That technique works. It also needs someone who has done it before.
Frequently Asked Questions
Can I replace just one coil spring on my car?
Technically yes, but it is a false economy. A new spring on one side and a tired spring on the other puts the car at a different height corner to corner, which changes how it sits and pulls to one side under braking. Since you have the corner apart anyway, doing both sides costs mostly labor time rather than extra parts. If money is the deciding factor, at minimum replace the pair on the same axle.
Should coil springs always be replaced in pairs?
On the same axle, yes. Springs are measured in pairs by rate and free length, and the factory ride height assumes both sides match. Replacing a single spring usually means replacing the other one on that axle too. You can replace one front spring and keep a matching rear spring if the car was built that way and the remaining springs are within spec. Replacing one spring and a strut on the other side is the combination that ends in an alignment fight.
Do I need a wheel alignment after replacing a coil spring?
Treat it as required, not optional. Changing the spring changes the length the strut sits in, which changes the strut angle and the position of the contact patch. Even if you never touched a tie rod, the alignment shifts. On a car with adjustable camber the effect is larger. A quick alignment is cheap compared with replacing a pair of tires worn unevenly by a car that never tracked straight.
How do I know which way a new coil spring should face?
The closed or tapered end faces down onto the lower spring seat, and the end with the tighter coil pitch faces up toward the upper perch. Mark the old spring with tape and a marker before you remove it, then line the new spring up against that mark. If the ends look identical, the free length and the taper are your guide, and the part number plus the paint code settle it when in doubt.
Can I replace a coil spring myself at home?
On a typical MacPherson-strut car or crossover, yes, provided you have rated jack stands, a wheel chock, a proper spring compressor with safety catches, and a torque wrench. The job runs a few hours, and the hardest part is not the spring, it is getting the compressor hooks to reach high enough or low enough on the coil to clear the perch. Air suspension, seized ball joints, and structural rust around the tower are reasons to hand it to a shop.
What should I do if a suspension fastener will not break loose?
Soak it in penetrating oil and give it time rather than adding force. Work the fastener back and forth a quarter turn at a time to break the corrosion seal, then use the correct size socket on a breaker bar for leverage. Never use an impact gun on the spring compressor itself. If the fastener is rounded off or sheared, stop and take the corner apart at a shop, because a broken fastener in the tower or control arm is a much bigger job than the spring.
Conclusion
Start by confirming which kind of setup you have. Standalone spring on a lower seat and upper perch, or a loaded strut assembly that arrives pre-assembled. That one answer sets your parts list and the whole removal sequence, and it takes five minutes with the service information in front of you.
After that, the job is mostly discipline. Rated stands on a factory lifting point, a compressor with safety catches and a tether on every compressed spring, gradual release in both directions, manufacturer torque values in the specified order, a clearance and ride height check, and an alignment before you drive it like you own it.
And if the corner is rusted through, the ball joint is seized, or the vehicle is on air springs, stop and let a shop handle it. Knowing when the safe call is the shop is part of knowing how to replace a coil spring safely.