
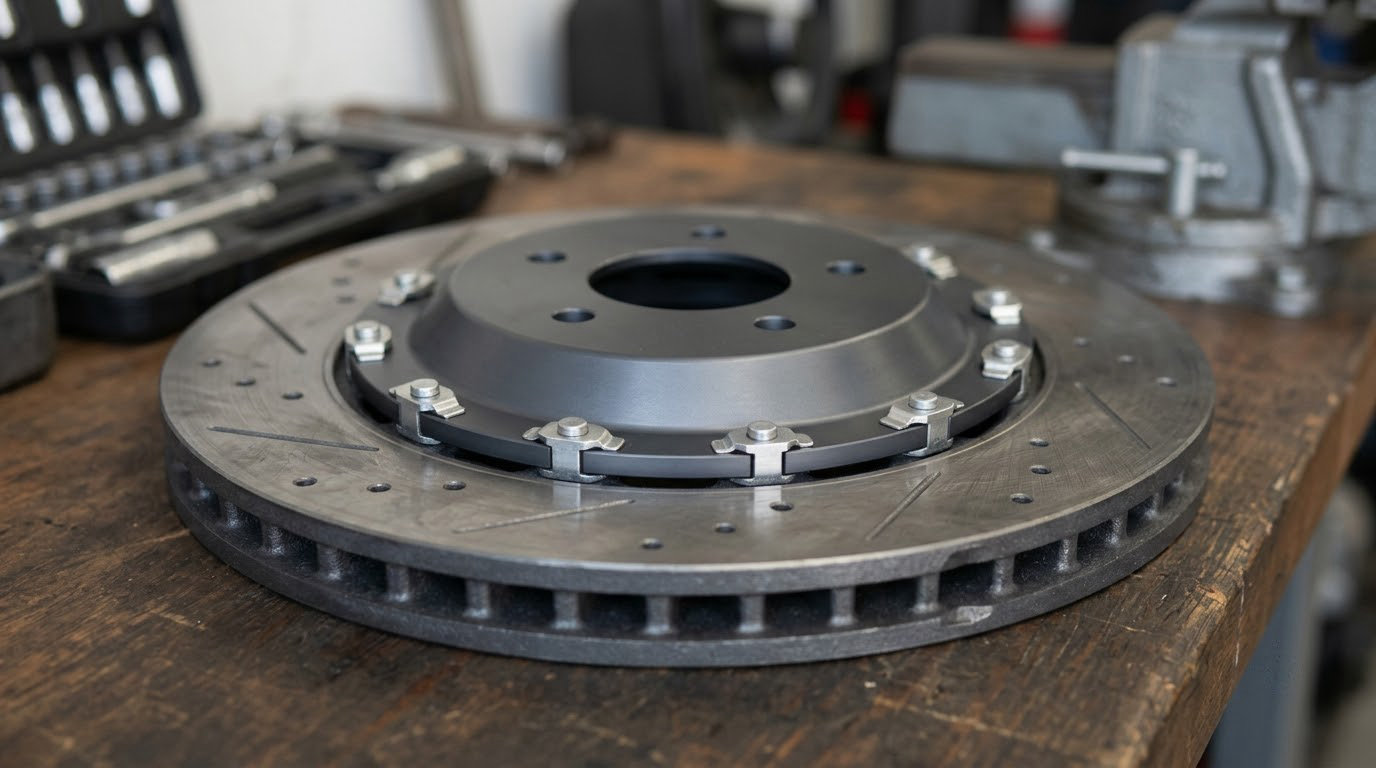
A floating brake rotor is a two-piece disc where the outer iron friction ring is joined to a lighter aluminum center hat with sliding hardware, so the ring can expand under heat instead of warping. If your pedal pulses or the wheel shimmies, this is the design you should understand first.
I get asked this constantly in the garage, usually by someone who just read a parts listing and had no idea their car had one. The terminology is also genuinely confusing: “floating” means something completely different for a rotor than it does for a caliper, and the two get mixed up constantly.
So let’s clear it up, then get into the part you actually care about: how these rotors fail, how they announce it, and how you narrow the cause down before you buy anything.
Table of Contents
What Is a Floating Brake Rotor?
A floating brake rotor is a two-piece brake disc in which an outer cast iron friction ring is attached to an inner aluminum hub carrier, or hat, using sliding hardware such as bobbins or drive pins. The friction face is not rigidly bolted to the hat, so the ring is free to expand and contract as it heats up while the center section stays bolted to the wheel hub.
Two terms get used loosely here. A fully floating rotor is the design described above, where the ring is separated from the hat by an air gap and floating pins. A semi-floating rotor has a hat riveted directly to the iron center section with no air gap, which is structurally different and much heavier. Mountain-bike forum regulars have flagged that several brands market semi-floating designs simply as “floating,” which is a good reason to check the construction rather than trust the label.
The hub flange is also almost never a flat plate. It’s a formed or machined top hat shape that pulls the hat’s outer edge inward and up, giving the assembly a stiff, dished profile without adding material where the rotor is largest. That shape is why a floating rotor can weigh less than a one-piece disc that fits the same envelope.
How the floating design differs from a fixed rotor
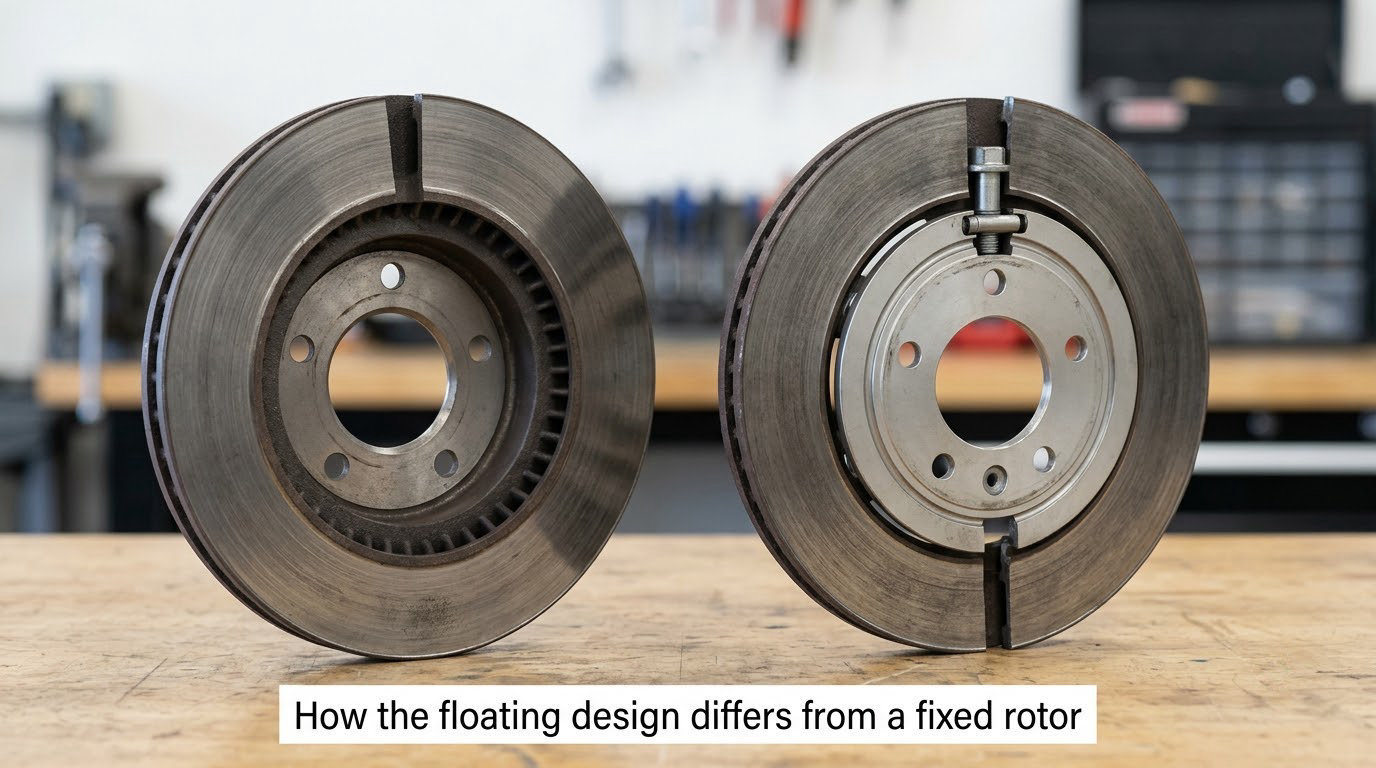
The difference is entirely in how the friction face is attached to the hub. A fixed rotor bolts the entire disc directly to the hub, so the whole thing is one rigid body. A floating rotor threads the retaining hardware through the hat and the hub only, while the iron ring rides on pins that sit in the gap between the two.
Those pins allow a small amount of axial and radial movement. It’s controlled movement, not slop, but it is exactly the amount of play the joint needs when the ring grows a fraction of a millimeter under braking heat.
| Feature | Fixed (one-piece) rotor | Floating (two-piece) rotor |
|---|---|---|
| Construction | Solid cast or forged iron | Iron friction ring plus aluminum hat |
| Friction face attachment | Rigid, bolted straight to the hub | Sliding on bobbins or drive pins |
| Thermal expansion | Iron expands from center outward, building stress | Ring expands independently of the aluminum hat |
| Heat path into the hub | Direct, iron to iron | Interrupted by the air gap and aluminum |
| Warping tendency | More prone to thermal coning | Strongly resistant to coning |
| Unsprung weight | Heavier at the same diameter | Lighter at the same diameter |
| Noise when cold | Usually silent | Often ticks briefly as the joint settles |
| Pad knockback | Less common | Can occur on worn pads; proper bedding limits it |
| Field serviceability | Replace the whole disc | Some designs allow ring-only replacement |
| Best suited to | Daily commuting, OE replacement | Track days, canyon driving, towing, mountain roads |
One manufacturer of motorsport two-piece rotors quotes a corner weight drop of roughly 35 to 40 percent against a comparable one-piece iron disc, with lateral runout held under 0.02 mm and thickness variation under five micrometers. Treat those as that builder’s numbers, not a universal spec, since mass depends heavily on rotor diameter.
Why Floating Brake Rotors Are Used
They exist because heat is what kills brake consistency, and iron handles heat badly when one part of it gets far hotter than the rest.
On a hard stop, the swept surface of a one-piece rotor heats fast while the center and hat stay closer to ambient. That temperature gradient forces the outer face to grow while the cooler center lags, which is called thermal coning, and the disc takes on a very slight cone shape. The coning is usually uniform and rarely causes damage on its own, but it shows up through the pedal as a periodic throb. Race engineers will tell you thermal coning is routinely misdiagnosed as warped metal, and they are usually right.
Stacking two metals with different expansion rates into one rigid part makes the problem worse. The floating joint sidesteps it: the ring is free to grow evenly on its own, and the aluminum hat behind it absorbs almost none of that heat and passes very little of it into the bearing and hub.
Weight is the second reason. A rotor is unsprung mass, which means it moves with the wheel and suspension rather than the body. Race Concept Solutions uses a rule of thumb that roughly 1 kg of unsprung weight removed is dynamically worth about 4 kg off the chassis, and BMW, Audi Sport, and most performance divisions fit two-piece designs for exactly this reason. Lower rotational inertia also means the car changes direction more willingly under braking.
The third reason is serviceability. Some two-piece designs let you replace just the worn iron ring and keep the hat, which spreads the cost over time. Directional-vane rotors push the idea further: the curved vanes act as a centrifugal pump pulling air from the center outward, and the vanes are mirrored from corner to corner because the rotors spin in opposite directions. That airflow is the main reason vane-equipped discs sound different from plain ones.
What Symptoms Can a Floating Rotor Cause?
The most common complaint is a pulsation through the brake pedal that comes and goes, usually worse when the brakes are hot. Second is a steering wheel shimmy that shows up at a narrow band of highway speed, often near 50 to 60 mph, and then disappears as you speed up or slow down.
Then there are the noises. A light tick or rattle in the first few hundred feet after leaving the driveway or a parking garage is the single most-discussed behavior of this design, and it drove a 70-plus comment thread on r/motorcycles. It is the floating hardware settling into its wear pattern as the ring and hat find their fit, and it usually quiets down within a mile or two. Owners in BMW and Ford enthusiast forums describe the same thing on road cars, and most of them figured it out and stopped worrying about it.
Surface marks are the fourth item. After a rainstorm on a car that sat overnight, you can get a thin film of rust on the swept face, and it produces a light grinding sensation for the first few stops until the pads polish it off. That’s a moisture issue, not a hardware issue.
What you might also see: brake dust that looks heavier than it used to, and pads that seem to eat faster. Both are usually the vane pattern working as designed rather than a fault.
It’s worth separating the symptom from the cause here, because several of these show up identically on fixed rotors. Pulsation can mean a bent rotor, a worn hub, or a caliper sliding unevenly on its pins. Shimmy can be a wheel balance problem or a bad wheel bearing. Ticking can be an anti-rattle clip, a caliper bolt, or a genuinely loose rotor.
Why Does a Floating Brake Rotor Warp or Wobble?
The honest answer is that a healthy floating brake rotor rarely warps for design reasons. When one does wobble, the cause is usually something else.
- Rust and uneven wear: a car that sits outside gets surface rust on the swept face, and braking only the high spots first can leave a measurable thickness difference between the pads and the disc.
- Past minimum thickness: once a disc is worn near its minimum thickness, the pad groove wears into it and the rim no longer has the stiffness it was designed with. That’s when lateral runout starts to matter.
- Overheating: a long grade followed by hard braking in a gear you shouldn’t be in can push disc temperatures past the point where the iron starts to lose temper. Faded brakes and a warped disc in the same drive are related events.
- Contaminated pads: fluid, oil, or chain lube on the pad face deposits unevenly and causes localized heating and glazing.
- Hub or fastener problems: a worn hub bore, corroded threads, or a torque wrench set to spec on a bent or rusted wheel face gives you a rotor that is not sitting square.
- Crash or curb damage: a real bend, which is different from heat-related coning and doesn’t fade with distance.
Torque deserves a specific mention. Over-torquing a floating rotor is a well-known way to induce lateral runout, because you’re pulling the hat into a slight cone as you tighten. Under-torquing lets the joint move more than it should. Either way, the correction is to clean the mating surfaces and use a torque wrench in the correct star pattern, not a breaker bar.
BMW M cars and E46 chassis owners have a long history with this exact topic. The consensus on the enthusiast forums is consistent: OEM two-piece rotors carry a price that aftermarket performance units don’t, while being lighter and handling heat better, and the failure that brings people to the forums is usually the caliper or the hub rather than the floating joint itself.
How to Diagnose the Problem Before Replacing Parts
Start with what you can see and hear before you take anything off. Jack the car, wheel off, and look at the swept face under good light.
Look for a shiny ridge or lip around the outer edge, which indicates real material loss, and check the friction surface for a blue or heat-blued patch, which means it has been cooked. Check the hat and the area where the ring meets the carrier for rust, staining, or a crack. A rotor that has been run to minimum thickness often shows a visible groove worn into the pad contact band.
Next, measure thickness at eight points around the disc with a micrometer. The manufacturer’s minimum is stamped on the hat, usually as something like “MIN TH 26.4 mm.” If the thickest point is already at or under that number, it’s finished, no matter how it looks. Discarded thickness variation between the highest and lowest reading is normally allowed to a few hundredths of a millimeter, and beyond that the disc will pulse.
For lateral runout, a dial indicator on a hub is the proper tool. Most shops will do this as part of a machine shop check, and it’s the single measurement that settles arguments about a rotor that’s within thickness spec. If you don’t have a dial indicator, ignore online advice about coin or quarter measurements and take it to a shop.
Then check the things that imitate rotor problems: wheel bearing play, caliper slide pin condition, wheel nut torque, and the pad material. A pad that has worn past the backing plate or a rotor with a lip on one side only points somewhere other than the disc.
On the road, find a quiet straight road and note whether the pulsation appears only under light pressure (usually a surface issue) or under firm braking from speed (usually runout or thickness). Never test a brake by making repeated hard stops on a public road. If the pedal feels spongy, drops, or pulls to one side, stop driving and have it looked at properly.
Can a Floating Brake Rotor Be Repaired or Replaced?
Yes, in that order of preference: machine it, replace it, or reuse the factory unit.
Resurfacing works only while there is usable material left above the minimum thickness and a usable friction band. It fixes surface rust, light scoring, and mild thickness variation, and a reputable machine shop will tell you honestly whether your disc qualifies. It will not fix a bent disc, a cracked hat, a damaged bobbins set, or a disc that has already worn to the minimum.
Replacement is the answer when thickness is out of spec, runout is beyond the limit, or the hat hardware is damaged. Match the OEM part number rather than guessing from diameter alone, because a bigger disc needs a different caliper, bracket, and often a different ABS tone ring relationship. A genuine two-piece rotor is a bolt-on swap for the factory calipers and lines, but the anti-rattle spring clips and pad wear sensors may need replacing too.
Same-vehicle reuse is reasonable when you’re replacing pads and pads are on a bed-in schedule. Some brakes can be rebed to a new rotor within the first half mile of bedding, but this is a manufacturer-specific technique, not a general rule, and it is easy to get wrong. If you’re not confident in it, replace the rotor.
On pads, stick with the compound the manufacturer specifies for the rotor. Rotor designs with directional vanes in particular need the pad shape and swept area to match, or you’ll get noise and uneven wear. Many of these rotors are quiet and feel consistent only when paired correctly.
Bedding matters more than most people expect, and a vendor guide I’ve used as a reference is a procedure of five to seven progressively firmer stops from about 60 mph down to 10 mph, cooling between each one, without coming to a full stop, then 200 to 300 miles of normal driving. That builds an even transfer layer on the friction face and is your best defense against the pad knockback that two-piece designs can pick up once pads are worn.
Finally, do not skip the fastener torque. A torque wrench in the correct sequence, on clean dry threads, is the whole job. And if the caliper bolts, hub, or sliders need work, have a shop do that part with the rotor off. Poking at a loaded brake assembly on a jack is how people get hurt.
Frequently Asked Questions
Are floating brake rotors supposed to make noise?
A light tick or rattle in the first few hundred feet after a cold start is normal and usually disappears once the hardware beds in. The floating joint needs a short settling period the way a new tire needs to seat. A tick that continues after the rotor is warm and hot, or a clunk under braking, is a different problem and points to loose hardware, anti-rattle clips, or a fastener that needs checking.
Can a warped floating brake rotor be resurfaced?
Only sometimes. A disc with light surface rust, mild scoring, or small thickness variation can usually be machined back within spec by a reputable shop. A disc that is bent from a curb or impact, cracked, run out beyond the limit, or already worn to the stamped minimum thickness cannot be fixed by machining. The machine shop will measure it and give you a straight answer, and that measurement is the deciding factor, not how the disc looks.
Is a floating rotor weaker than a fixed rotor?
No. The friction ring is the same high-carbon cast iron that does the braking on a fixed rotor, so the braking surface is just as strong. What differs is the mounting: the ring is retained by floating hardware instead of being bolted solid. A quality floating rotor with intact bobbins, correct torque, and adequate thickness handles repeated hard braking better than a thin one-piece disc, because the joint relieves thermal stress instead of trapping it.
How do I know if a rotor should be replaced?
Measure the thickest point with a micrometer and compare it to the minimum thickness stamped on the hat. If it is at or below that number, it is done. Add a check for a visible lip at the outer edge, heat bluing, a groove worn into the pad band, or thickness variation beyond spec. Any one of those means replacement, and a dial indicator check of lateral runout by a shop will settle any remaining doubt about a pulse you can feel.
Does a floating rotor need to be replaced as an axle pair?
Not as a rule, though matching front rotors on the same axle is good practice because uneven friction characteristics across a front axle can upset brake balance. Always replace in pairs on the same axle, and if the other side is well within spec and undamaged, reusing it is reasonable. The bigger reason to do both sides at once is the bedding window: new pads and a new rotor on one side need the same settling period on the other for consistent pedal feel.
What to Do First
If you’re chasing a vibration or a pedal pulse, start with a micrometer and the minimum-thickness number stamped on the hat. That single measurement rules out most worn rotors and costs almost nothing. If the disc is comfortably in spec, move on to wheel balance, hub condition, and pad material before you decide that a floating brake rotor is the problem.
If you’re buying instead of diagnosing, the floating brake rotor is worth it when the car spends real time at speed or on grades, or when you’re chasing lower unsprung weight. For a gentle city commuter, a quality one-piece rotor is the sensible, cheaper choice, and it will not let you down.
One last thing: expect a brief cold tick from a new floating brake rotor, bed the pads in properly, and torque the fasteners with a wrench. That covers most of what people mistake for a defect.