
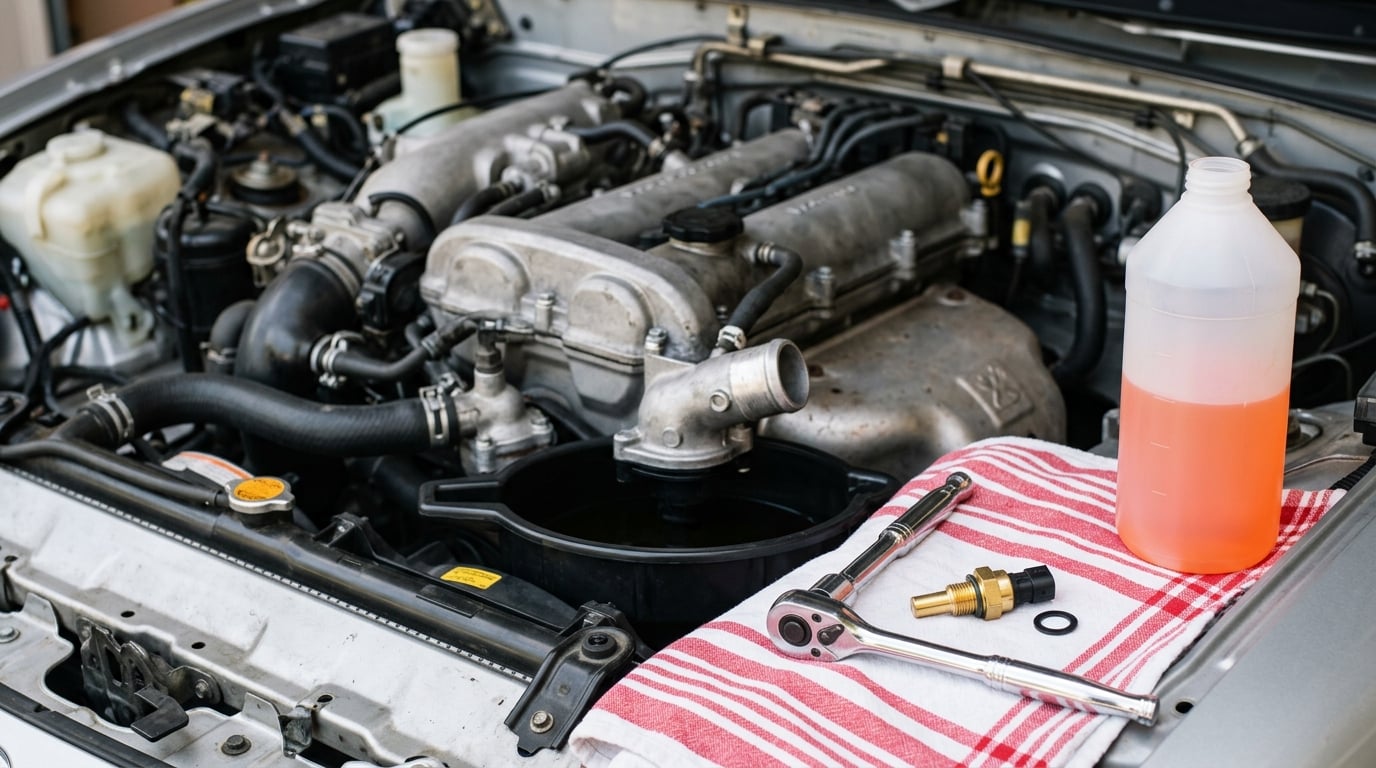
Replacing a coolant temperature sensor on a BMW takes about 20 to 40 minutes with basic hand tools and a deep socket or crowsfoot. Let the engine cool completely, unplug the electrical connector, unscrew the old sensor, thread in the new one fast to limit coolant loss, top off the reservoir, then clear the codes and watch the gauge. No full coolant drain is needed on most models.
The hard part is not the swap. Owners on BMW forums describe the job itself as a five-minute task once you can reach the sensor, and the real blocker is finding it and knowing which of the temperature sensors on the engine you actually need. On many four-cylinder BMWs the engine coolant temperature sensor sits at the front of the cylinder head near the thermostat housing, and the fault shows up as BMW code 12003 or a generic P0128.
Before you buy a part, confirm the sensor is the problem. A stuck thermostat, low coolant, a radiator fan relay or air trapped in the cooling system all produce the same overheating complaint, and replacing a perfectly good sensor will not fix any of them.
Table of Contents
- What You Need to Replace a Coolant Temperature Sensor
- Step-by-Step
- Common Mistakes
- Frequently Asked Questions
- What are the common symptoms of a bad coolant temperature sensor on a BMW?
- Can I replace a coolant temperature sensor myself?
- How do I know which temperature sensor to replace on my BMW?
- What coolant should I use after replacing the sensor?
- Do I need to remove the entire cooling system to replace the sensor?
- How long should I wait before driving after replacing the sensor?
- Conclusion
What You Need to Replace a Coolant Temperature Sensor
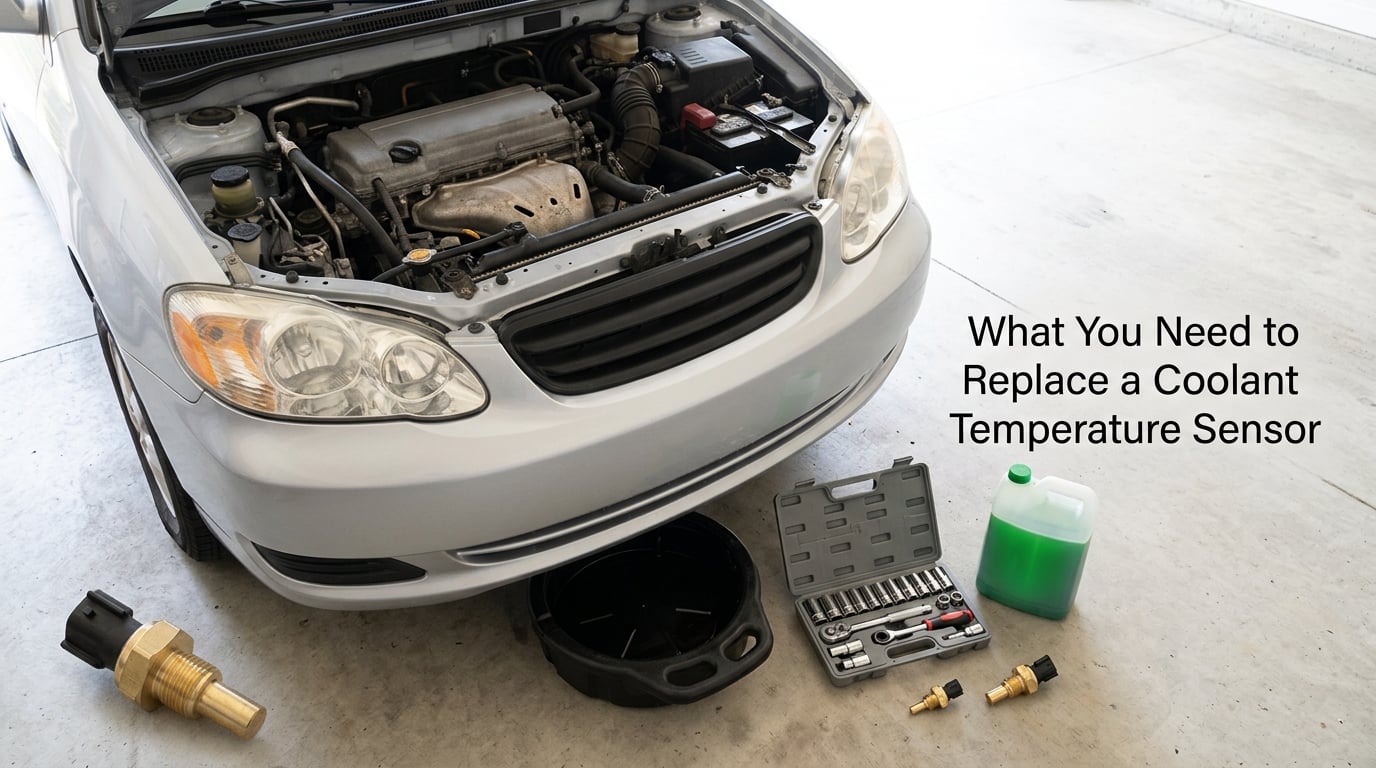
You need less than most people expect. Here is the list:
- The correct replacement coolant temperature sensor, matched to your VIN
- A deep socket, often around 19 mm, or an open-end wrench or crowsfoot that fits the sensor hex
- A flat screwdriver or pick tool for the connector release, plus a ratchet and extension if the sensor sits deep behind a bracket
- A small catch pan or a large container and a few shop rags
- Coolant that matches what your BMW specifies, in roughly the amount your cooling system holds
- Gloves and eye protection, because the fluid is hot and it stains
- A torque wrench and the torque figure for your model, plus an OBD-II scanner to clear and read codes
Check the sensor size against the listing before you order. BMW has used more than one thread size and connector style over the decades, and an M12 sensor will not thread into an M10 housing no matter how good the part looks in a photo.
Your owner manual is part of the tool list, not an optional extra. It gives you the exact coolant specification, the bleed procedure, the torque figure, and the location diagram. Torque values are not guessable and they vary by model, so take the number from the manual rather than from a forum post about a different engine.
Where the sensor lives also changes with the engine. Some BMWs mount it on the front of the cylinder head, some on the engine block near the thermostat housing, and some build it into the housing itself. If your car is still under warranty, check that before starting, because opening the cooling system yourself can void coverage on the remaining factory warranty period.
Step-by-Step
How to Locate and Inspect the Coolant Temperature Sensor
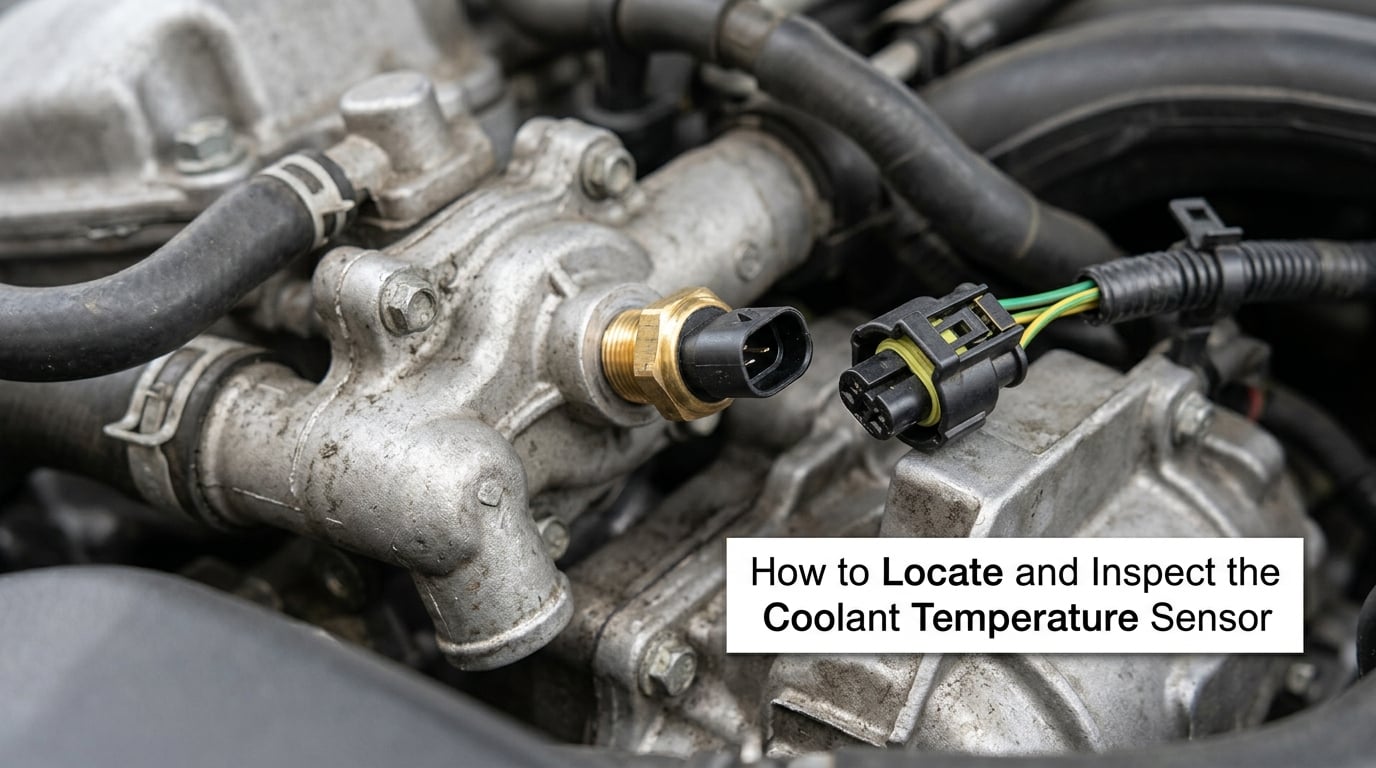
Follow the large upper coolant hose from the radiator to the thermostat housing and look on that housing for a small threaded probe with an electrical plug on top. On many BMW four-cylinder engines that is the front face of the cylinder head, which matches where owners look when chasing a 12003 code.
On engines with an oil cooler mounted to the side of the block, a second probe often appears nearby. That is the oil temperature sensor, and swapping the wrong one leaves your fault code exactly where it was. Read the wiring diagram or part number off the old sensor before you touch anything, or pull the part number by VIN so there is no guessing.
Inspect the connector while the sensor is still installed. Green corrosion on the pins, coolant residue inside the plug, or a housing that looks brittle are all reasons to clean and check the wiring rather than just bolt on a new sensor. A connector that has been wet will fail again within months.
Some cars send one signal to the engine computer and use a separate sensor for the dash gauge. Replacing only the ECU sensor can leave the needle behaving oddly, so check your wiring diagram for how many temperature sensors your engine has and what each one feeds.
Prepare the Vehicle and Drain Coolant
Park on level ground, set the parking brake, and let the engine cool until it is stone cold. Not warm. A few hours is often not enough after a drive, so leaving the car overnight is the easy answer. Opening a hot cooling system puts boiling coolant in your driveway and can crack the expansion tank.
Switch off the ignition, open the boot and disconnect the negative battery cable. This stops stray current while you work around the plug and it clears the memory of some modules. A flat-blade screwdriver is usually the fastest way to loosen the clamp.
Note the coolant level in the expansion tank before you start, then check the level in the engine block or radiator if your model has a sight glass or a second tank. That is your fill reference at the end.
You do not need to drain the system. Removing a sensor breaks into the circuit and lets out a small amount of coolant, usually a cup or two, and on some models you have to move a coolant line or a fastener to reach the sensor at all, which spills a bit more. Put the catch pan under the housing first, lay out the rags, and never open the radiator cap on anything but a cold system.
Collect the coolant that comes out in a sealed container and take it to a recycling point. It is toxic, it attracts pets, and it will strip paint off a driveway in a few hours.
Remove the Old Sensor
Unplug the connector before you turn the sensor. Most BMW plugs have a locking tab that you lift or slide first, then the plug comes straight off. Do not pry the plug off with the sensor still threaded in, and do not wiggle the wires, because the terminals inside the connector bend and then never seat properly again.
Fit the deep socket or crowsfoot and turn the sensor out counter-clockwise. Keep the socket square to the sensor axis as it loosens. If you lean on it, the plastic thermostat housing or the coolant passage can crack, and now you are replacing a housing too.
If the sensor refuses to move, do not reach for more force. Move the socket to a different corner and try again, which usually frees a seized sensor, or warm the area slightly and let it cool. A heat gun on the hex only, kept well away from hoses and wiring, helps when a sensor has corroded into its threads.
Wipe the threads clean and look into the hole. Coolant that has leaked past the old seal leaves a crusty deposit, and damaged threads or a weeping seal mean there is a second problem that the new sensor will not fix on its own. Note it now rather than after the new part leaks.
Install and Reconnect the New Sensor
Fit the new sealing O-ring or washer that came with the sensor. This is the single most common leak cause in this job, and the washer is cheap enough that replacing it twice is still cheaper than a hose. Only use thread sealant if your manual calls for it and the new sensor has no O-ring, since sealant on an O-ring-equipped sensor will stop the sensor from sealing properly.
Start the new sensor by hand, straight down the axis of the thread. Turn it until it is snug and confirm it is engaging the threads rather than cutting across them, then back it out and reset if it binds. Cross-threading will strip the housing and the job turns into a much larger one.
Tighten it to the torque figure from your model manual. Do not use an impact wrench and do not lean on the handle until it stops. A torque wrench is cheap insurance here, because overtightening cracks the sensor body or the housing it screws into.
Push the connector back on until it clicks and give it a gentle tug to confirm it is locked. Route the wiring so it cannot chafe against a bracket, a hot exhaust pipe or the fan shroud, and zip it back to the original clip rather than letting it hang into moving parts.
Refill the Cooling System and Check for Leaks
Refill the expansion tank with the coolant your BMW specifies, up to the level you noted before you started. Use the coolant in your manual rather than matching by colour, since different BMW coolant specifications have looked similar over the years. Cold fill should sit between the MIN and MAX marks, and if you are topping up rather than replacing, our walkthrough of how to top off coolant correctly covers the cold and hot level checks in more detail.
Run the engine and let it warm up with the radiator cap in place. On many BMWs the coolant level rises as the engine warms and the plastic tank expands, so the final level is set on a hot engine. If the gauge climbs normally and there are no drips at the sensor, the seal is good.
Watch for trapped air as well. A cooling system that spits coolant back, a gauge that swings fast, or a heater that blows cold can all point to an air pocket rather than a failed part. Bleeding a BMW often means leaving the heater on high, the fan on low and adding coolant at the bleed point as the level drops, so follow the bleed procedure in your manual.
Let the engine cool, check the level once more and top up if it dropped, then look under the car before you put it away. A small drip that shows up an hour later is the difference between a rag and a tow. If you did spill some on the driveway, deal with it straight away using our guide to clean up a coolant spill in the driveway, rather than leaving it to sit.
Clear Codes and Verify the Repair
Reconnect the negative battery cable and turn the ignition on. Connect your scanner and read stored codes before clearing them, so you know what was there. On a BMW, a full diagnostic app with live data shows the engine coolant temperature value the computer is being told, and that is the number that confirms the fix.
Clear the codes, then watch the live data from a cold start. The reading should sit near ambient temperature, climb smoothly as the engine warms, and settle in the normal operating range. A value that stays pinned, jumps to 80 degrees the moment the key turns, or shows -40 degrees means the new sensor is not being read properly and you have a wiring or connector problem, not a sensor problem.
Also watch the dash gauge and the fans. The needle should move off cold within a minute or two of starting, and the fans should run at temperature. Drive the car for 15 to 20 minutes, including one longer stretch at steady speed, then recheck for codes and coolant level.
If the code comes straight back, work through the list in the next section before ordering another part. The usual causes are a coolant level that never came back up, a connector that is not fully seated, or a sensor that is not the component that set the code in the first place.
Common trouble codes to expect
These are the codes that send most owners looking for this sensor, and the ones worth reading before you spend money on parts.
| Code | Meaning | Most likely cause | Next action |
|---|---|---|---|
| P0117 | Engine coolant temperature circuit low input | Short circuit, failed sensor, damaged wiring | Check connector and harness, then measure sensor resistance |
| P0118 | Engine coolant temperature circuit high input | Open circuit, unplugged sensor, blown fuse on some models | Check the plug is seated and the harness is intact |
| P0128 | Coolant temperature below regulating thermostat temperature | Stuck thermostat, low coolant, or a sensor reporting cold | Verify live data before replacing anything |
| P0217 | Engine over-temperature | No coolant, fan or relay fault, air pocket, failed sensor | Stop driving and diagnose the cooling system |
| 12003 (BMW) | Engine coolant temperature sensor fault | Failed ECT sensor, corroded connector | Match the part by VIN and replace, then clear codes |
Common Mistakes
Buying the wrong sensor is the most expensive mistake, and it is entirely avoidable. BMW has used different thread sizes, connector pin counts and resistance curves over the years, and a visually identical sensor from a different engine will throw the same code all day. Match by VIN or by the part number on the old sensor.
Opening a hot cooling system is the most dangerous one. A radiator or expansion tank cap on a warm engine vents scalding coolant under pressure, and it will find your legs, your driveway and your dog. The engine goes cold first, every time, with no exceptions.
Over-torquing cracks the part you just paid for. It can also crack the plastic coolant housing the sensor threads into, turning a cheap job into a coolant housing and a thermostat replacement. Use the manual figure with a torque wrench, and stop there.
Forgetting the O-ring or washer leaks the new sensor minutes later. It is a small ring and it is included with the sensor, and reusing an old one is a false economy. Fit the new one and check the threads are clean before you start.
Not clearing the codes after the swap sends you round in circles. A BMW will often keep the old fault in memory and light the warning light again even with a good new sensor. Forum owners have described exactly this: a new sensor, no change, then a code clear and the light stayed off. Clear the codes and watch live data before you judge the part.
Forgetting the coolant top-up is the quiet one. A cooling system that is a little low may still run cool for a while and then start pumping air, and you end up chasing a leak that is not there. Check the level cold and hot, and keep the old coolant for the top-up so you match what is already in the system.
Driving before you have checked for leaks risks putting a puddle of coolant on the road. A few minutes of walking around the engine bay with the lights on catches almost everything, including the small drip that only shows up once the system is fully hot.
Assuming the sensor is the cause is the mistake that wastes the most money. If the gauge reads cold while the engine is genuinely hot, the ECU is being told the engine is cold, it enriches the mixture, and the fans may never come on. That is a genuine risk of driving it, and it is worth stopping on the side of the road and switching off rather than finishing the journey.
Frequently Asked Questions
What are the common symptoms of a bad coolant temperature sensor on a BMW?
The usual signs are a temperature gauge that stays on cold or reads wrong, cooling fans running constantly, a check engine light with P0128 or BMW code 12003, and coolant level dropping with no visible leak. Cold-start hesitation, high idle and poor fuel economy also show up, because the engine computer richens the mixture when the sensor reports a cold engine. A stuck thermostat can cause all of the same symptoms, so confirm with live data before buying a part.
Can I replace a coolant temperature sensor myself?
On most BMWs, yes. The sensor is a small threaded part with an electrical plug, and the job needs a socket or crowsfoot, a catch pan and a coolant top-up rather than any specialist equipment. The difficulty is access. On some engines the sensor sits behind an intake, a coolant line or a bracket, which adds time. If the car is still under warranty, check the terms first, and follow the torque figure in your model manual rather than tightening by feel.
How do I know which temperature sensor to replace on my BMW?
Follow the upper radiator hose to the thermostat housing and look for a small threaded probe with an electrical plug. Nearby there may be a second probe for oil temperature, which is a different part entirely. Some engines also feed the dash gauge from a separate sensor, so replacing only the ECU sensor can leave the needle wrong. Reading the part number off the old sensor or looking it up by VIN is the surest way to buy the right one.
What coolant should I use after replacing the sensor?
Use the coolant specification in your owner manual, and match what is already in the system. BMW coolant specifications have changed over the years and have not always looked different from one another, so do not rely on colour to judge what is in your engine. Buy enough to refill what the cooling system holds in case a low level or an air pocket needs more. Collect the old coolant and take it to a recycling point rather than pouring it out.
Do I need to remove the entire cooling system to replace the sensor?
No. Removing the sensor breaks into the cooling circuit and lets out a small amount of coolant, usually a cup or two, which you catch in a pan and top back up. On some models you have to move a coolant line or a fastener to reach the sensor, so a little more comes out than on a bare engine. A full drain and flush is a separate job and is not required unless you want the whole system serviced at the same time.
How long should I wait before driving after replacing the sensor?
Drive only after the engine is warm, the gauge is behaving, there are no drips under the car and the coolant level has been rechecked. Warm the engine to normal operating temperature, drive for 15 to 20 minutes at steady speed, then stop and look underneath before you go further. If the gauge stays on cold while the engine is hot, or the temperature warning comes back, leave the car parked and diagnose it rather than driving it.
Conclusion
Start by confirming the part: match the sensor by VIN, check that the live temperature data really is wrong, and rule out a stuck thermostat and low coolant before you open anything. Then work on a cold engine, unplug the connector, swap the sensor with a new O-ring, tighten it to your manual figure, and refill to the level you noted.
Finish the job properly: clear the codes, warm the engine up, watch the gauge and the fans, and check underneath for drips before you drive away. That is the whole repair, and it takes under an hour for most BMWs. Updated for 2026.