
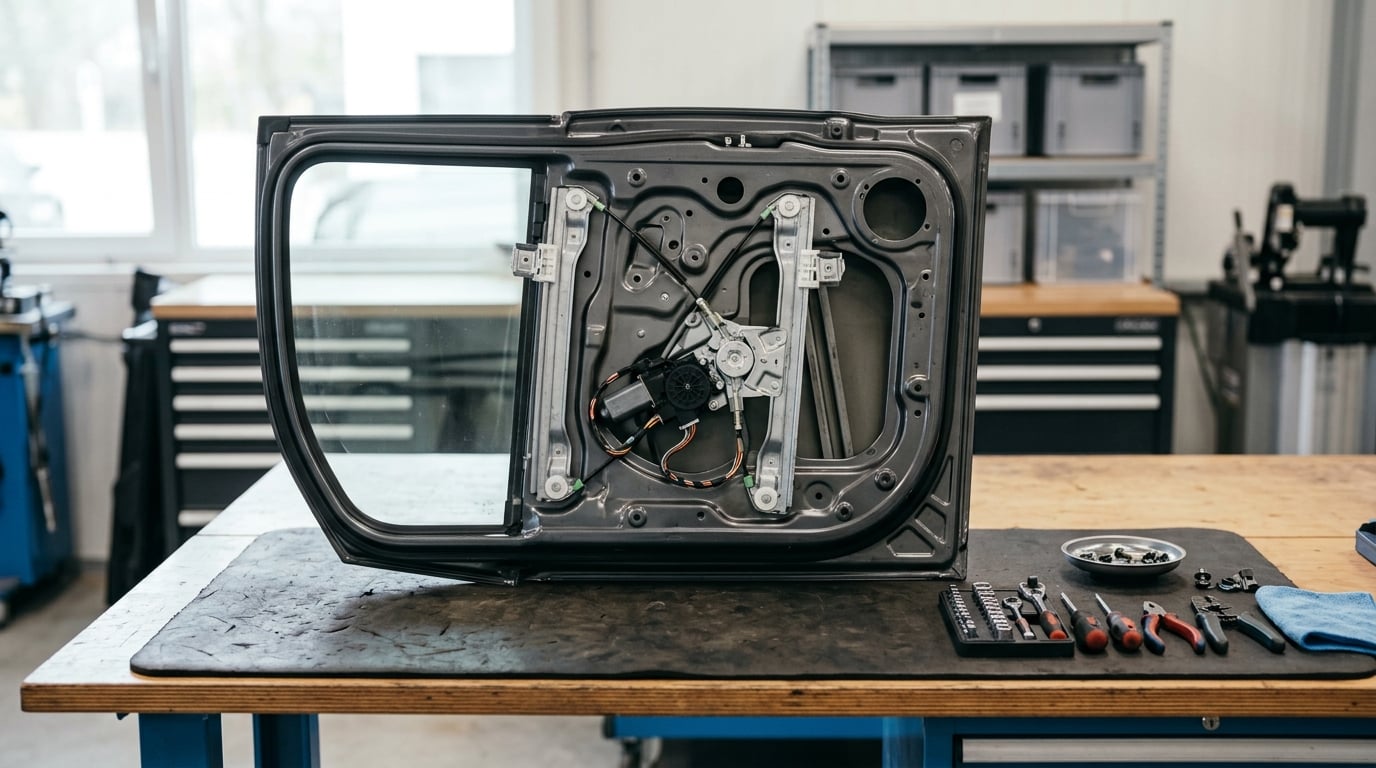
A BMW window regulator is the mechanism inside the door that carries the glass up and down. The motor turns a small worm gear, that gear winds a steel cable or drives a scissor arm, and a set of plastic guide clips grips the bottom of the glass. This guide covers diagnosing the fault, opening the door, replacing the failed part, and resetting the window so it behaves like it did when the car was new.
Budget 1.5 to 3 hours for a first attempt, and expect a difficulty around 3 out of 5. The part itself is rarely the hard bit. Protecting the tempered glass and the brittle trim clips on the way in and out is what turns a two-hour job into a weekend.
Last updated October 2026.
| Difficulty | Time | DIY feasible | Biggest risk |
|---|---|---|---|
| 3 out of 5 | 1.5 to 3 hours | Yes, on most BMWs | Dropping the glass into the door |
One thing worth knowing before you buy anything: on most BMWs the first piece to fail is a small plastic guide clip, not the motor. Owners on BimmerFest and Bimmerpost say the same thing over and over on older cars, and it changes what the repair actually involves.
Table of Contents
- What You Need
- BMW Window Regulator Repair: Step-by-Step
- Common Mistakes
- Frequently Asked Questions
- How do I know if my BMW window regulator or motor has failed?
- Can I repair a BMW window regulator without removing the door panel?
- Do I need to replace the entire window regulator assembly?
- Why does the window work slowly before it stops?
- What should I do if the window glass falls inside the door?
- How long does a BMW window regulator repair take?
What You Need
The tool list is short, and most of it you probably already own. The part is the part you need to identify correctly first, because the clip, the gearbox and the whole assembly are three different jobs.
- Plastic trim removal tools. Metal screwdrivers gouge the door card. A set of cheap trim wedges gets the panel off without scars.
- Torx and Phillips drivers. T20 Torx covers most interior trim on E32 through E90 cars, with a T25 on later door hardware. A small Phillips set handles the regulator and gear area.
- Socket set and a ratchet. Needed for the bolt-and-nut conversion described in step 4.
- A rivet tool or the reverse. Either a hand rivet gun to fit new rivets, or a drill and the correct-size bit to pull factory rivets out. Check the door shell for a ground spot before you drill anywhere.
- Long breaker bar or large screwdriver. This is how you move the glass down and back manually when the motor will not.
- Side cutters or heavy wire cutters. For the emergency cable release, and for trimming a cable that has come off its track.
- Silicone grease. Dabs on the guide clips and cable spool. It stays inert against rubber and plastic where petroleum grease would attack them.
- Butyl tape or fresh sealant. The vapour barrier has to be resealed properly or water gets behind the trim.
- A wedge or a block of wood. The door shell drops away from the body when the panel comes off. Prop it.
- A small parts bag and painter’s tape. Every trim clip that snaps is another trip to the parts counter. Bag them, and tape the glass to the frame if it is at all loose.
For documentation, use your own vehicle. The BMW technical information system, or the service manual for your chassis, has the door card fastener layout and the glass adjustment procedure for your year. Chassis codes differ enough that a guide written for an E34 will not match an E60 door.
BMW Window Regulator Repair: Step-by-Step
1. Diagnose the Window Problem
Diagnose before you remove anything, because the fix ranges from a two-minute clip swap to a full assembly replacement. The sound the window makes and the way it fails tell you which part died.
| Symptom | Likely cause | Repair path |
|---|---|---|
| Grinding, clicking or ratcheting noise, window still moves | Worm gear teeth or the gearbox cover stripping | Gearbox only |
| Motor runs, glass does not move, loud clicking | Cable off the spool, or a stripped rack gear | Gearbox, or full assembly if the cable is frayed inside the door |
| Window sits crooked or tilts when closed | One or more plastic guide clips broken or split | Clips only, if the rails are straight |
| Window falls into the door cavity | Glass released from the clips entirely | Glass recovery first, then full assembly |
| Slow, stuttering travel, no noise | Dry cable, dry guide channel, motor drawing extra current | Service the cable and grease, then re-test before buying parts |
| Nothing happens on one door, others fine | Fuse, door switch, wiring in the door jamb, or the module | Electrical diagnosis before any disassembly |
| New regulator fitted, window still dead | Window never reinitialised | Reset procedure in step 6 |
Work the switch in both directions and listen. Grinding or ratcheting that follows the motor means the gearbox. A motor that spins freely with silence and no movement usually means the cable has come off its spool or a clip has let go.
Check the other doors. If two windows on the same side are dead, suspect a fuse or the body control module rather than two failed regulators. Your owner’s manual lists the door and body fuse assignments for your car.
If the glass is stuck part way up, before you take the door apart you can free it with a pair of heavy wire cutters. Open the panel, snip the cables, and the glass loses its tension enough to move by hand. Several owners describe this as the emergency fix that gets the car out of the rain while the real part is on backorder.
2. Remove and Protect the Door Panel
Remove the door panel with the glass fully closed and supported, because the closed position is the only one where the regulator is unloaded and the glass is held by the clamp instead of hanging in the door. Prop the door open and disconnect the battery negative terminal before you touch the wiring.
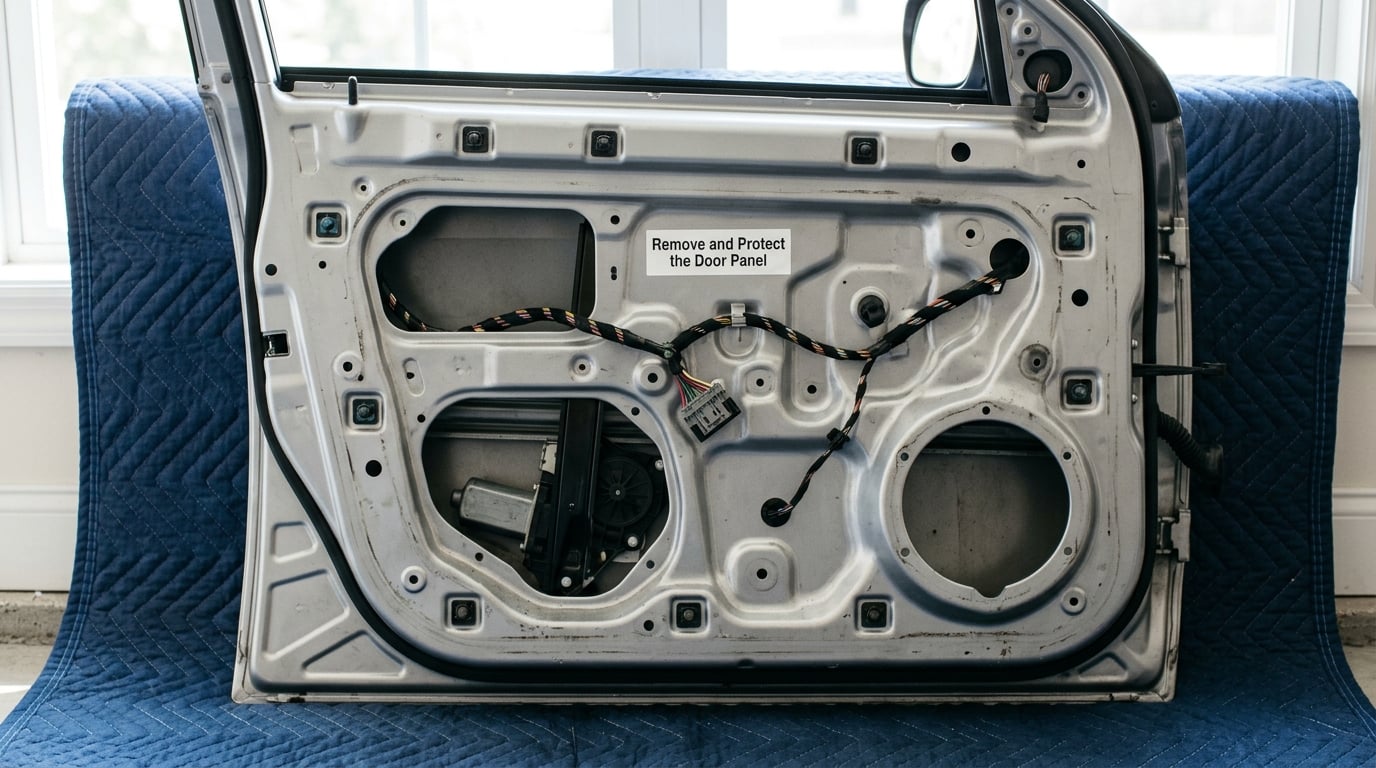
Work from the bottom up. Pry the trim panel away from the sill, then the rear edge near the B-pillar, then the front edge at the mirror. Most BMW door cards lift off once those three edges are clear, and pulling hard on the belt line is what cracks the top clips.
Bag every clip as it comes off. If one does snap, a generic trim clip kit will get you back together, but a BMW card is a poor fit with the wrong tabs.
With the card off, peel the vapour barrier back from the top edge only. You are not removing it, you are folding it down far enough to reach the regulator. The sticky butyl around the edge is what keeps water out of the door, so keep it clean and do not fold it back on itself.
Wedge the door shell so it cannot swing out and drop. Now you can see the motor, the cable spool and the regulator frame.
3. Access the Regulator and Motor
Accessing the regulator means taking the weight off the glass. Unplug the motor connector and any switch harness connector first so a live motor cannot move the glass while your hands are on it.
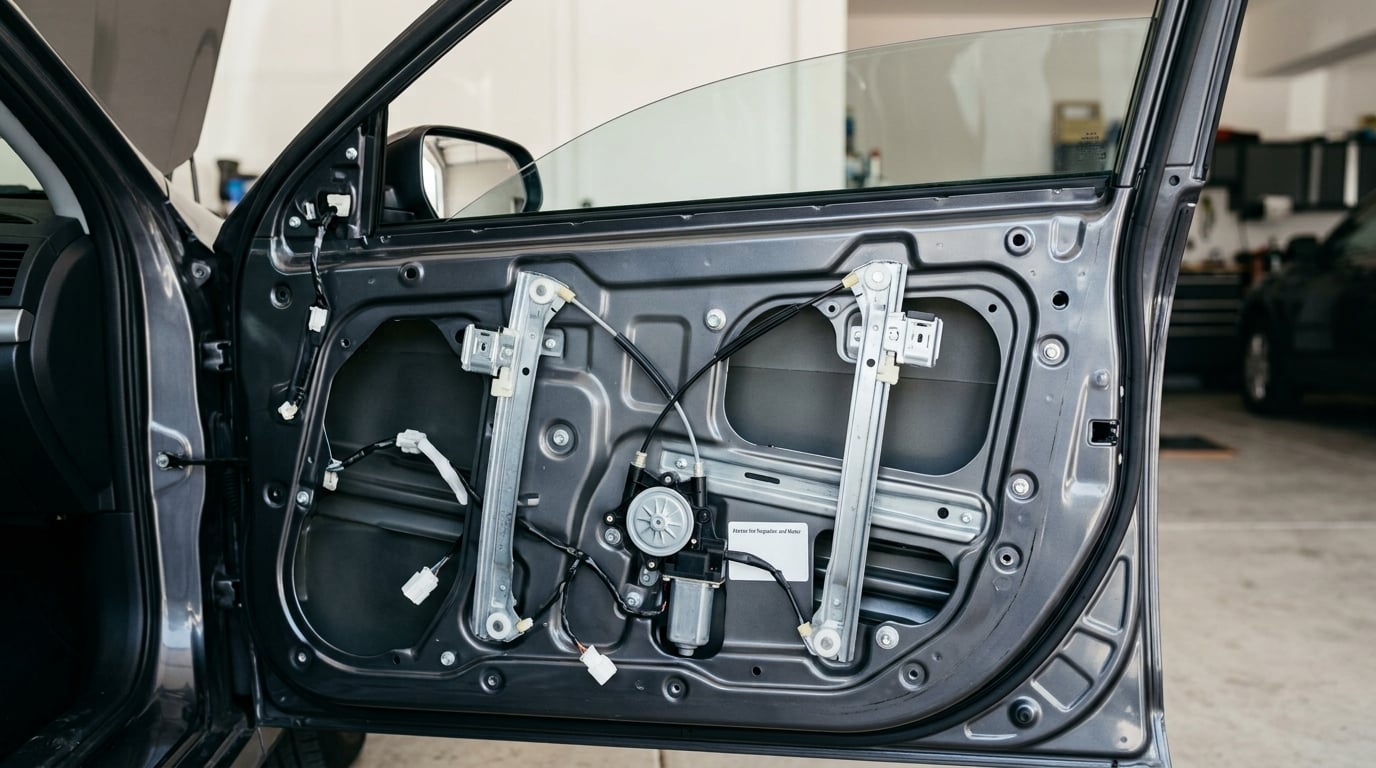
On most cable-driven regulators the glass sits in two sliding clips that ride in the regulator frame. Reach in, press the glass rearward and downward, and it comes out of the frame entirely. Support it on a folded blanket on the sill the second it is free.
On scissor-type regulators the glass is held in a carrier plate on a scissor arm, and the procedure is the same in principle but the arm has to be driven to a known position first with the motor. If the arm is between positions, use the long breaker bar or a large screwdriver on the sector gear to move it slowly, as the gear-collapse write-ups describe.
With the glass out, you can see the fasteners. Older and mid-range cars use factory rivets, which are a one-way trip. Later cars use bolts. Note which you have before you start, because drilling a rivet in the wrong spot puts a permanent mark in the door shell. If a stripped hole or damaged thread turns up while you are in there, how to retap a stripped thread covers the five repair methods that fix it properly.
4. Replace the Failed Component
Most BMW window regulator repairs fall into one of four paths, and the right one is decided by the diagnosis in step 1. Replacing the whole assembly when only a clip broke is the most common and most expensive mistake owners make.
| Repair path | Best for | Time | Extra work |
|---|---|---|---|
| Guide clips only | Window tilts or sits crooked, rails and cable are fine | 30 to 60 minutes with the panel already open | Clip the new parts onto the existing regulator |
| Gearbox or rack gear only | Ratcheting or grinding noise, motor still turns | 1 to 2 hours | No rivet drilling, no glass removal on many designs |
| Motor only | Dead motor, cable and mechanism move by hand | 1.5 to 2 hours | Unplug and unplug the motor harness |
| Full assembly | Glass fell into the door, cable frayed, multiple clips gone | 2.5 to 4 hours | Rivet removal or drilling, glass transfer, new seals |
For the clip-only job, buy the sliding guide clips and fit them to the regulator before the assembly goes back in the door. That is far easier than reaching into the door with a clip in your fingers. If the clips are the known weak point on your chassis, this is the moment to fit the upgraded nylon versions rather than the original part, which costs nothing extra in labour.
For the gearbox-only job, the sector or rack gear can be extracted with a screwdriver driven through the gear into a screw head, then gripped with locking pliers. Owners across several BMW forums confirm the whole job can be done with two small sheet-metal screws and a pair of Vice Grips, with no rivet drilling at all. Put a dab of silicone grease on the gear mesh before reassembly.
For the full assembly, if the original motor is proven good, move it and its wiring across to the new regulator so you keep a known-good motor. A used genuine BMW regulator is widely preferred over a new cheap aftermarket unit on older cars, and on E32, E34 and E36 cars especially. Check a used unit for stripped rivet holes, cracked rails, a stiff cable spool and a ratcheting worm gear before you commit to it.
| Chassis | Typical regulator type | Notes and part numbers seen often |
|---|---|---|
| E32, E34 | Cable-driven | Front regulator 51321944069 and 51321944070; guide clip 51321938884 is the part that actually breaks |
| E36, E39, E46 | Cable-driven | Same clip-driven failure pattern; the clip number carries over on many doors |
| E82, E87, E88, E90, E92 | Cable-driven, riveted | Bolted on later builds, which makes repeat service much easier |
| E60, E65, E70 | Scissor-type | Carrier plate and scissor arm instead of guide clips; fails differently and needs the glass fully supported |
Verify the part number against your own door before ordering. Left and right are not interchangeable on most of these, and a rear regulator is a different piece again from a front one.
While the door is open, convert any rivets you remove into bolts and nuts. It takes a few extra minutes and means the next person, including you, can get the regulator out without a drill. Torque-sensitive jobs get a separate approach, so how to read a torque spec chart explains the markings before you set them rather than guessing by feel.
5. Reassemble and Reconnect
Reassembly runs backwards, with three details that decide whether the job holds. Seat the glass fully in the clips or carrier plate before anything else, route the cable in its track without a kink, and reseal the vapour barrier on clean metal.
Press the glass into the guide clips until the retainer tabs snap on both sides. A clip that is on but not fully seated is the same failure you already had. Put a thin film of silicone grease on the clip contact surfaces and the guide channel; that is the cheapest preventative measure on the whole job.
Feed the cable onto the spool the way it came off and check it moves freely through the full travel by hand. If it binds, the routing is wrong, and the cable will saw through the plastic channel if you power the motor anyway.
Reconnect the motor and switch harnesses, then the vapour barrier, pressing the butyl back down along the whole edge. Refit the door card starting with the bolt tabs, then work the top edge in, then push the lower and rear edges home until the clips click.
6. Test and Reset the Window
Testing is not optional after a regulator job, because the window has to relearn its travel limits before the anti-pinch function works properly. Reconnect the battery, turn the ignition on, and cycle the window fully down and up twice on manual, then run it to the top with the switch held.
On most BMWs the window initialization is the same five-step routine, and it is the step owners skip, which is why a new regulator sometimes looks like a dead one.
- Close the doors and windows, turn the ignition on, do not start the engine.
- Press the window switch to the first detent, not all the way, and hold it.
- Keep holding after the glass reaches the top of its travel. It will continue into the learning position and pause briefly. Do not release during that pause.
- Release, then run the window fully down to its stop and back to the top using the one-touch position.
- Repeat the up and down one-touch cycle two or three more times. Some modules need a handful of attempts before the anti-pinch memory is stored.
If the window still does not one-touch after that, leave the ignition off for about five minutes with the battery reconnected, then start the sequence again. On cars from the E60 generation onward, a scan tool with the BMW coding function is the reliable way to run initialization and to confirm the door module sees a valid regulator signal.
Place a hand near the top of the glass as you test. If the motor reverses when it senses resistance, the anti-pinch relearn worked. If it does not, stop using the one-touch function until the reset takes.
Common Mistakes
Almost every BMW window regulator job that goes wrong goes wrong in one of these eight ways. Each one is avoidable if you know it is coming.
- Dropping the glass into the door. The cable no longer carries the weight as soon as the clips are off. Support the glass on a blanket on the sill the moment it is released, and never leave it sitting loose in the frame.
- Pinching the wiring. The harness between the body and the door gets crushed if you close the door with the panel hanging or the barrel disconnected. Reconnect the barrel before you close anything.
- Snapping trim clips. Prying from the wrong edge, or using a flat blade, breaks the card every time. Work from the sill and rear edge with plastic tools, and bag the clips as you go.
- Routing the cable outside its track. A crossed or kinked cable will run hot and chew through the plastic channel. Feed it back the way it came, by hand, before you power the motor.
- Leaving fasteners loose. A regulator that is not fully torqued or a rivet that only looks seated will back out and let the glass tilt again. If you converted rivets to bolts, set them properly.
- Forcing the rack gear. If the sector gear will not index, something is still loaded. Take the tension off the glass before you put a screwdriver through the gear, or you will strip the gear that you just replaced.
- Skipping initialization. A new regulator with no reset gives a window that moves slowly and does not anti-pinch. Owners report this more than almost any other problem, and it is fixed in five minutes in the driveway.
- Letting water in behind the trim. A vapour barrier folded back on itself or sealed on a dirty edge causes damp carpet later. It is a slow fault that looks nothing like the job that caused it.
One more habit pays off: photograph the regulator cable routing and the glass clip positions before you pull anything off. When the part is in your hands and the diagram is in your head, the reference photo is what gets the cable back in the right channel.
Frequently Asked Questions
How do I know if my BMW window regulator or motor has failed?
Listen first. Grinding, clicking or ratcheting that follows the motor points at the gearbox teeth or rack gear. A window that tilts or sits crooked when closed usually has a split plastic guide clip. A silent motor with no movement means the cable came off the spool or a clip let the glass go. If two windows on the same side are dead, check the fuse and the door switch before you remove any trim.
Can I repair a BMW window regulator without removing the door panel?
Partly. The gearbox on many cable-driven regulators can be reached by lifting the door card and folding the vapour barrier down, which is enough for a gear-only replacement and avoids rivet drilling entirely. Clips and glass both need the card off. On scissor-type regulators used on E60 and later cars, the glass has to come down and out, so the full strip-down is unavoidable.
Do I need to replace the entire window regulator assembly?
No. Decide from the symptom. Split guide clips on a mechanism that otherwise moves smoothly need clips only. Ratcheting or grinding with the motor still turning needs the gearbox or rack gear. A dead motor with a healthy cable needs the motor. Replace the full assembly when the glass fell into the door, the cable is frayed inside the door, or several parts are gone at once.
Why does the window work slowly before it stops?
Slow travel usually comes first from a dry cable or a dry guide channel, and the motor is drawing extra current to force it. A stripped sector gear on the way out can produce the same symptom with a rising ratcheting noise. Grease the cable and guide channel and retest before buying anything. If it still crawls, the gearbox is going, and you have just bought yourself time to source the right part.
What should I do if the window glass falls inside the door?
Do not drive with the door open and do not try to fish the glass out through the panel opening. With the card off, remove the regulator or free the carrier so the glass can be lifted straight up out of the door. Tempered glass that has dropped often chips along the bottom edge where it lands, and a chipped edge is a safety failure, not a cosmetic one.
How long does a BMW window regulator repair take?
A clip-only job takes 30 to 60 minutes with the door open. A gearbox or motor replacement runs 1.5 to 2 hours. A full regulator replacement, including the door card, vapour barrier, glass removal and reassembly, takes 2.5 to 4 hours. Rivets instead of bolts add time. If you have never had a door card off before, plan on the long end of that range.
Start by working the switch and listening, not by ordering a regulator. Most BMW window regulator jobs turn out to be guide clips, and that is a half-hour fix rather than a full strip-down. If the diagnosis says assembly, set the glass on a blanket the moment it comes free, take your time with the cable routing, and finish with the five-step reset so the window remembers where its limits are.