
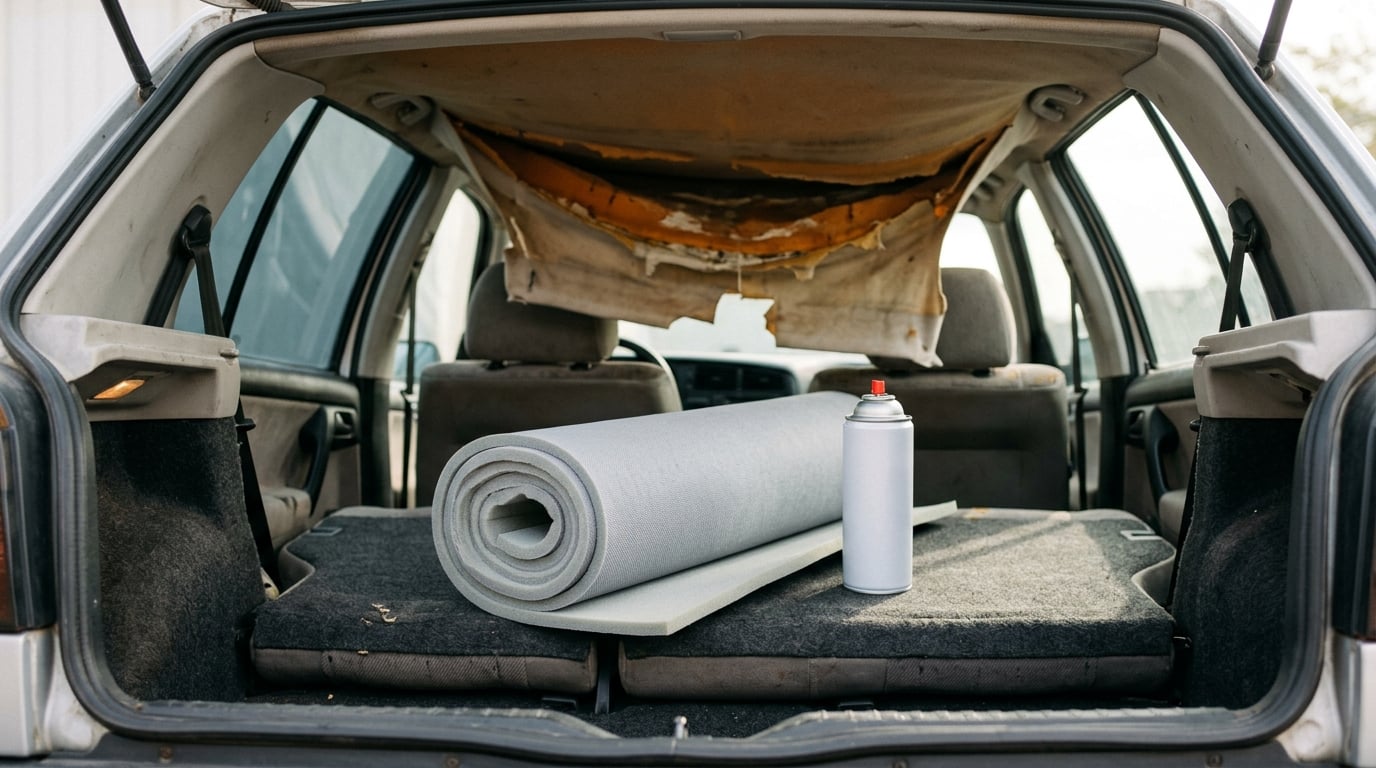
A sagging headliner comes down to one thing: the factory glue holding the fabric to the board has dried out, and a decade of heat and humidity has finished the job. If only a corner has let go, you can reattach it in 15 to 30 minutes with trim fasteners or a light dusting of spray adhesive. A full sag across the roof means pulling the board and re-gluing new fabric, which is a 2 to 4 hour job plus drying time.
Pick your path by looking at the damage, not at the shape of the car. The quick fix holds for months and costs almost nothing. The full re-cover lasts years and looks like new, but it is the one where a broken dome light connector can derail your whole weekend.
Either way, find the cause before you glue anything back down. A headliner that fails because of a leak will fail again the same way, and this time you will have new fabric to throw away.
Table of Contents
What You Need
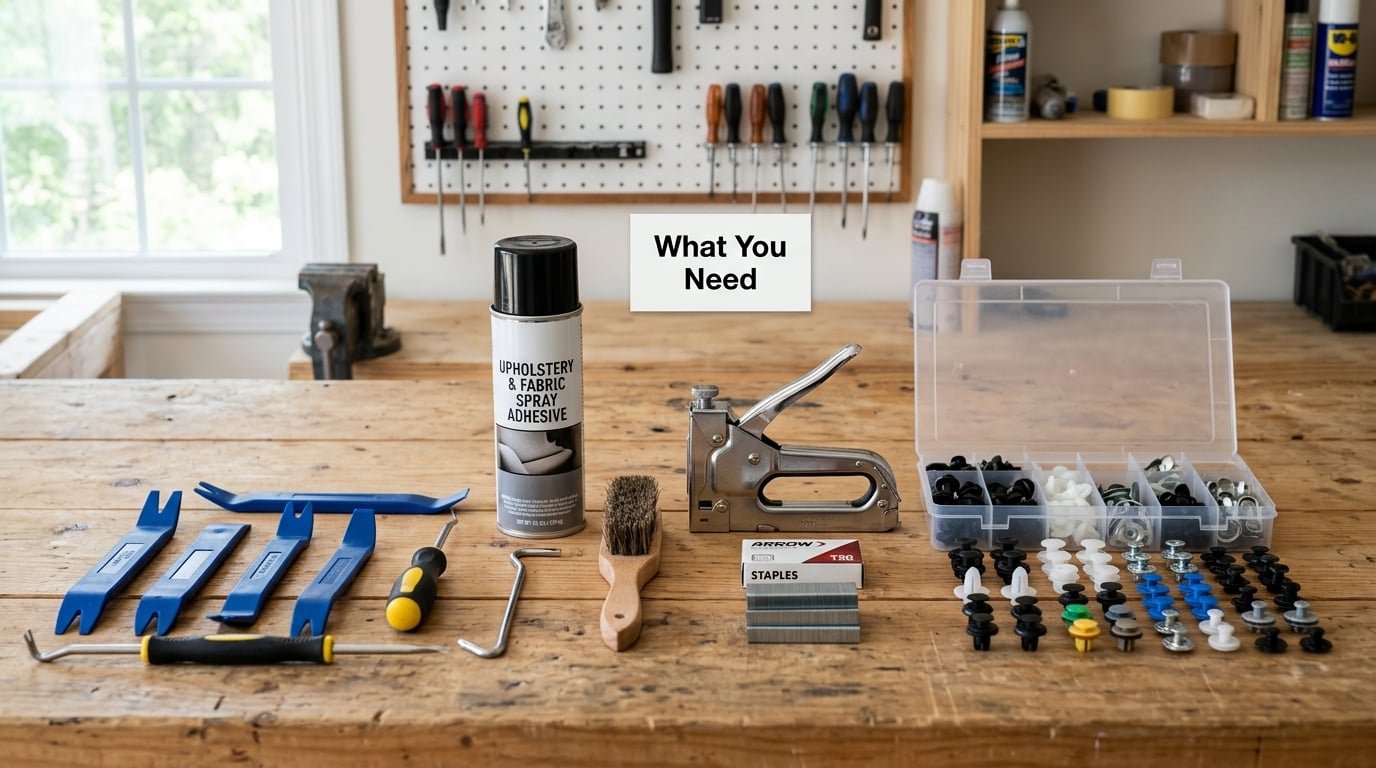
Gather everything before the car goes apart, because a headliner job stops halfway more often than a brake job does.
- Clear-headed upholstery twist pins or trim fasteners — the cheapest and fastest fix. You push one through a small hole in the fabric and it flares open on the back side.
- High-temperature spray adhesive — 3M Super 77 or 3M 76 are the two names people actually use. Both are contact adhesives that bond as they dry, not wet glues that soak in.
- Contact cement or upholstery adhesive — Weldwood is the common pick when you are re-covering the whole board and want more open time than a spray gives you.
- A staple gun — long staples work at the windshield edge and along the outer roof rail, but only where no one can see them.
- Trim tool set and a plastic pry bar — for the visors, dome light, grab handles and pillar trim. Metal levers crack plastic tabs every time.
- Stiff wire brush, plastic scraper, and a shop vac — for stripping crumbling foam off the board. The foam turns to grey dust and it gets everywhere.
- Foam-backed headliner fabric — sold by the yard at upholstery suppliers. Non-backed fabric is thinner and harder to keep wrinkle-free, so buy the foam-backed version if you can.
- A small paint roller — pressing the fabric down from the centre outward removes bubbles better than your palms.
- Masking tape, a marker, and a torque driver — tape marks trim locations before removal so reassembly is guesswork-free.
Safety gear is basic here: eye protection when you strip foam or brush adhesive, gloves because old foam and dried glue are sticky and unpleasant, and a dust mask in a car that has been closed up in the sun. Ventilate the car with the doors open while you spray adhesive. The fumes are strong and they linger.
Budget substitutions work fine. A dollar store staple gun handles the edge staples, and a plastic card makes a decent scraper. What you cannot substitute is adhesive — household spray glue softens in a hot car and gives up within a few weeks.
Check the owner’s manual before you pull anything near the roof. It shows how the dome light, sun visor connectors and overhead console are wired, and on some vehicles they have to be disconnected in a specific order. If the sag is near a sunroof, find the leak first.
How to Fix a Sagging Headliner Step by Step
Work through these in order. Each one assumes the previous step is done, and skipping the diagnostic stage is how people end up re-gluing a headliner that was never going to hold.
1. Diagnose Why the Headliner Is Sagging
A sagging headliner usually has one of four causes, and each one needs a different response.
- Heat and age. On a car 10 years or older, the factory adhesive has turned to brittle crumb. The fabric peels away from the board in flakes. This is the most common case and the easiest to repair.
- Humidity. Repeated damp and dry cycles loosen the bond along the roof rail, so the sag starts at the edges and works inward.
- A water leak. A sunroof drain, windshield seal or window weatherstrip sends water into the headliner cavity. The foam soaks, sags under its own weight and starts to rot. You will find brown or black staining and a musty smell.
- Trim removed or a retainer popped. A visor, grab handle or pillar clip came out at some point and was never put back correctly, and the fabric followed it down.
Now check the fabric itself. A loose edge that is still attached to the board takes the quick fix. Fabric hanging free with a torn edge, or a board you can see through, needs the full re-cover.
Put your hand on the foam through a gap. Intact foam feels firm and spongy. Water-damaged foam compresses under your fingers and leaves residue on your palm. That is the case where a new headliner is money you would only be throwing away.
2. Protect the Interior and Work Safely
Park outside or open the doors wide. A car with an open roof in a garage fills with spray adhesive vapour fast, and the same fumes that bother you will haze the plastic trim you are trying to keep clean.
Remove anything loose from the cabin before you start: sunglasses, garage remotes, loose trim pieces, blankets, child seats. Drop a clean sheet over the seats and dash so stray adhesive does not end up on your upholstery.
Disconnect the battery negative terminal if you are removing the dome light, visors, or overhead console. Those circuits are switched, but a short during a trim removal is not worth the risk of a damaged wiring module.
Take photos of everything before you disconnect it, and label each connector with masking tape. Dome light housings on older cars have two separate plugs that look nearly identical, and swapping them costs a trip to the parts counter.
Route the wiring aside rather than letting it hang. A harness pulled tight as the board slides out is the single most common way people break a factory connector.
3. Remove the Affected Trim Carefully
Work from the middle outward, one piece at a time, and never force a clip. Brittle plastic in a door card or a headliner retainer snaps, and a snapped retainer can mean opening up the whole edge to replace it.
Start with the sun visors on their side of the car. Most mount with two fasteners or a single screw in the centre, and often a plug for the vanity light. Note the orientation of the plug before pulling it.
Next comes the dome light housing and the overhead console. The console usually slides back along the roof rail and then drops. A hand tool in the gap is safer than a wide flat blade, which will gouge the fabric as soon as it slips.
Grab handles and pillar trim come out with a trim tool under the plastic cap. On many cars, the headliner edge tucks into a channel above the door, and pulling that channel down exposes the edge of the board. Take the A-pillar trim loose at the same time if the fabric is peeling back there, because the same glue failure is usually behind it.
For the board itself, mark the location of the front edge against the windshield before you slide it, and never pry against the glass. The board usually needs to tilt forward a few inches to clear the roof bow, then come out through the door opening. If it will not move, something is still clipped or a weatherstrip is hooked over the edge.
4. Prepare the Headliner and Roof Liner
With the board out, work somewhere flat and lit — a garage floor with a blanket down is better than the roof of the car.
Pull the old fabric off in long strips, keeping the grain in one direction. Old cloth often tears instead of peeling, and that is normal. Work a plastic scraper under the stubborn sections and leave a little backing stuck rather than fighting it.
Strip the foam with a stiff wire brush, working across the grain. A hand brush is slower but safer. A grinder or orbital sander will strip it fast and will also take the board skin with it in a couple of passes, so only reach for one if you know what the substrate underneath is.
Vacuum everything, then wipe the board down and let it dry fully. Any dampness left at this point becomes a bubble later.
Trim loose threads and patch small tears with a scrap of the same cloth, using a little adhesive underneath. A headliner with holes will never lay flat no matter how good your glue is.
Test the adhesive in a corner you will never see. Let it dry to a tack, press a small piece of scrap fabric onto it, and wait a few hours. If the fabric lifts at one edge with a fingernail, change adhesives before you coat the whole board.
5. Apply the Right Adhesive and Reattach the Fabric
Contact adhesives bond two surfaces as the solvent flashes off. That is why the technique matters more than the brand.
- 3M Super 77 is a high-strength spray with a high temperature rating, which matters in a car interior that reaches well over 100 degrees. It grabs fast, so you need your cloth cut and ready.
- 3M 76 is the more forgiving relative. It has a longer open time and a bigger area pattern, which suits a full board where you are laying one large panel.
- Contact cement such as Weldwood is applied by brush or roller, lets you control coverage exactly, and gives you minutes of working time before it grabs. Most shop-quality headliner work uses this family.
Whichever you use, spray or brush it on the board side, not on the face of the fabric. Then let it dry until it is tacky to a light touch, usually 30 to 60 seconds. That dry-to-tack step is what separates a repair that lasts from one that bubbles.
Over-spraying is the single most reported mistake on this repair. A wet coat soaks into the foam, drips, and dries to a white haze on the surface that does not come off. Forum users who learned this the hard way describe the same thing: a light dusting, worked on in a well-ventilated space, is what works.
Lay the cloth on the board, starting at the front centre near the windshield. Roll it down toward the rear with a paint roller, always pushing the air out in one direction. Never push a bubble back and forth across the board — that spreads it and stretches the fabric.
Keep tension light. Pull the fabric snug rather than drum tight, and stretch it slightly along the grain as you go so the board edges end up covered evenly. Wrinkles come from slack, not from a bad roller.
6. Reinstall Trim and Let the Repair Cure
Re-glue the perimeter with the same adhesive used on the board, then tuck the fabric back into the channel above the doors. Staple or pin at the tight corners where the original had a retainer, since those take the most pull.
Slide the board back in at the same angle it came out, front edge first, and check that the windshield seal and any sunroof frame sit on the fabric rather than under it. Both of those pinching a corner is what causes the sag to come back in six months.
Reconnect the dome light, visors, and console, then reclip the pillar trim, grab handles and headliner retainers. A retainer that is not fully seated looks fine and quietly pulls the fabric loose later.
Check for wrinkles from the outside, looking up the length of the roof with the doors open and the light behind you. Small bubbles flatten under firm pressure; a large one usually means air trapped between the board and the cloth, and you can lift and re-lay that section while the adhesive is still soft.
Give it 24 hours before heavy use, and a couple of days before you leave a car in full sun with the doors closed. Curing adhesive reaches full strength slowly, and driving a loose headliner around a corner on the way home is how a careful job gets ruined.
Common Mistakes and How to Avoid Them
Nearly every failed headliner repair traces back to one of a handful of mistakes. All of them are cheap to avoid.
Using too much adhesive. The instinct is to coat everything heavily, and that is backwards. Contact adhesive bonds on contact, so more product means soaking, bleeding through, and residue. Use the lightest even coat the label calls for and let it dry to a tack.
Pressing the cloth on while the adhesive is still wet. Wet adhesive grabs the cloth unevenly and traps air. Wait until the surface is tacky but not wet to the touch — 30 to 60 seconds for spray, longer in cold weather.
Pulling the fabric taut before it is set. Stretch a fabric-backed headliner while gluing and it will relax as the car heats up, and you get a sagging area in a new place. Lay it with light tension and let the material do the work.
Ripping the old fabric off in one violent pull. The cloth tears and leaves patches that make the board harder to clean. Take it off in strips with a scraper and accept that some backing stays behind.
Prying trim with a metal tool. Headliner retainers and visor brackets are thin plastic and they snap. A plastic trim tool costs almost nothing compared with replacing a broken visor bracket.
Ignoring a hidden leak. If the foam was wet, the same water is still up there, and it will find the new fabric. Fix the sunroof drain or window seal first, dry the cavity completely, and only then re-cover.
Forgetting that the roof of a closed car is hot. Adhesive that looks fine in the shade can soften and creep in a parked car in summer. Park in the shade for the whole job.
When to Replace the Headliner Instead
Some damage is past the point where adhesive helps. Replace rather than repair when any of these apply.
Rot or mould in the foam. Brown or black staining, a musty smell that returns after cleaning, or foam that crumbles to dust between your fingers means the substrate is gone. You can glue new fabric onto that, but it will never lie flat and the smell will come back.
Widespread tears. A hole you can cover with a pin is a quick fix. Fabric that has torn in several places, or along a seam, is a re-cover job.
The board itself is damaged. Cracked, delaminated or warped boards need replacing with the new headliner rather than a patch on top of them.
It has detached more than once. If you have re-glued the same area twice and it is down again within months, something structural is wrong — usually a retainer that is not seated or a leak you have not found.
You are not comfortable with the wiring. Hardwired dome lights, visors with integrated electronics, and vehicles with a sunroof or a large overhead console add steps where a mistake is expensive. An upholstery shop handles that in a day.
Professional work is also the sensible call on a classic or a car you are preparing for sale, where the headliner is the first thing a buyer looks up at. It is one of the most visible interior defects and a full re-cover is one of the bigger interior line items.
Frequently Asked Questions
How do you fix a sagging headliner without removing it?
Push clear-headed upholstery twist pins or trim fasteners through a small hole in the loose fabric and let them flare open on the board side. For a larger loose area, apply a light dusting of high-temperature spray adhesive such as 3M Super 77 to the backing, let it dry to a tack for 30 to 60 seconds, then press the fabric flat with a roller. Use less adhesive than you think you need; over-spraying leaves a white residue that does not come off.
What are the common causes of a sagging headliner?
Age and heat are the most common reasons: the factory adhesive dries out and turns brittle after a decade of sun and temperature swings. Humidity works the same bond loose along the roof rail. A leak from a sunroof drain, windshield seal or window weatherstrip soaks the foam until it sags and rots, which is the one cause that must be fixed before you re-glue anything.
What is the best adhesive to reattach a headliner?
For a small loose area, 3M Super 77 is the most commonly used spray because it handles cabin heat well and grabs fast. For re-covering an entire board, 3M 76 gives you more open time, and a contact cement such as Weldwood gives the most control over coverage. All three are contact adhesives, so apply to the board, let them dry to a tack, then press the cloth down. Avoid ordinary spray glue; it softens in a hot car.
Do I need to remove the headliner board to fix it?
No, not for most repairs. A corner that has let go, or fabric hanging near a door, can be reattached in place with trim fasteners or spray adhesive. Pull the board only when the fabric has fully detached from it, when the foam underneath is rotted or needs stripping, or when the sag is so widespread that a partial fix would look patched.
How long does a DIY headliner repair last?
A partial repair done with trim fasteners or a light dusting of spray adhesive usually holds for months to a couple of years, depending on how hot the car gets. A full re-cover with new foam-backed fabric and proper contact adhesive is a different job and typically lasts as long as the original. If your sag returns within a few months, the cause is usually a leak or a retainer that never went back in.
Start by pressing on the foam through a gap. Firm and springy means you are dealing with dried-out adhesive, and a bag of trim fasteners will hold it while you plan the rest. Soft, stained or crumbling means a leak got in first, and that gets fixed before anything goes back up. Once you know which problem you have, the rest is just careful work in the shade.