
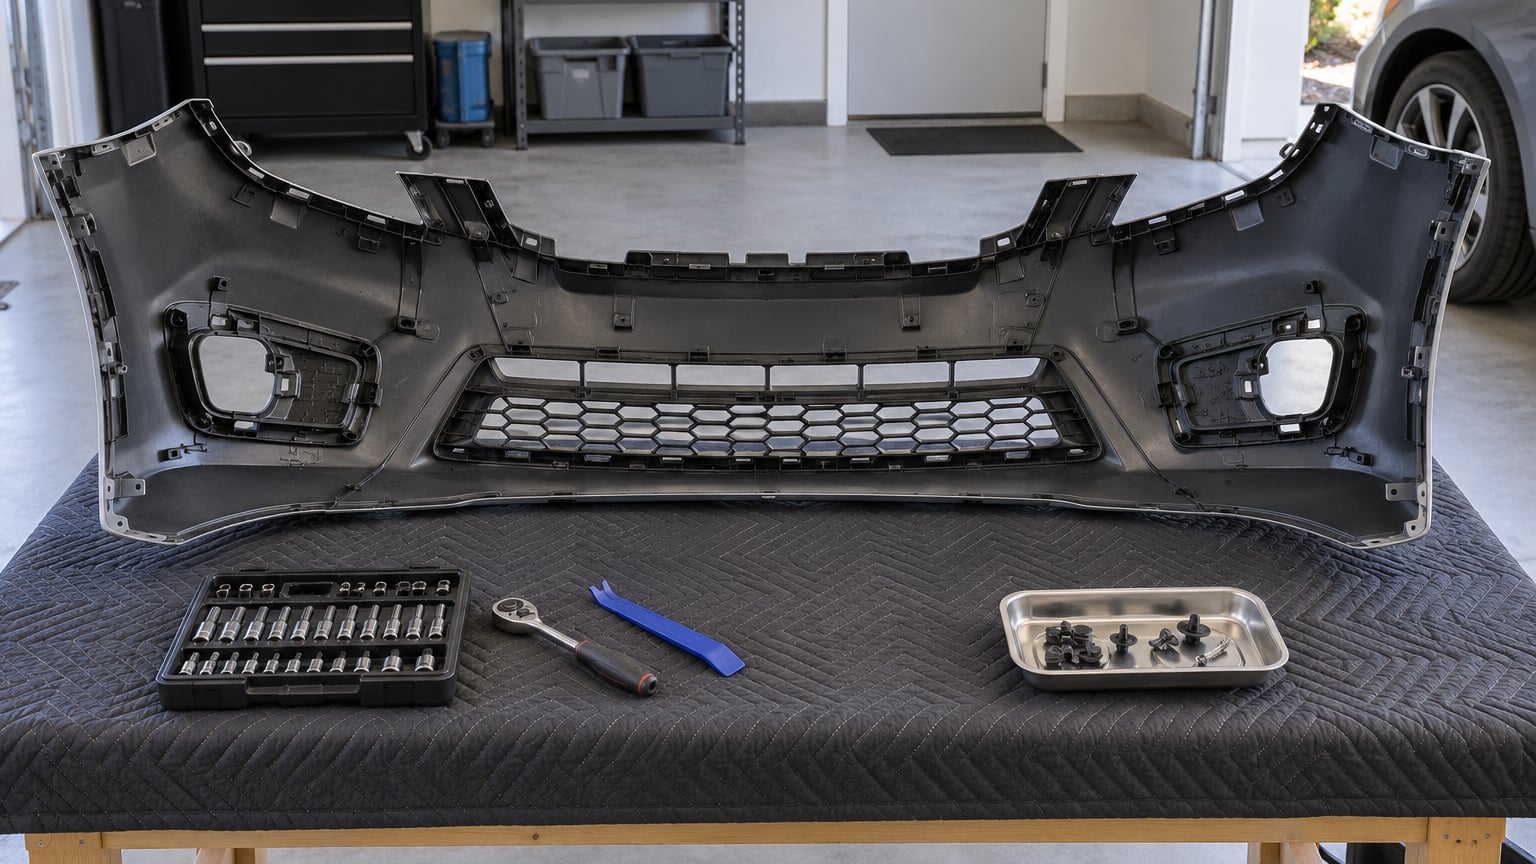
To remove a bumper cover, gather a socket set (usually 7mm, 8mm, or 10mm depending on the make), a flat-blade screwdriver, a trim clip removal tool, and a blanket, then systematically unfasten the top, sides, underneath, and wheel well clips before pulling the cover free. On most cars it is a 30- to 60-minute job for a beginner, and nothing on it is structurally complicated.
The catch is patience, not strength. Nearly every snapped clip and cracked cover traces back to someone pulling hard because a hidden fastener was still in place. Take an extra five minutes to find that fastener and the job gets much easier.
Before you start, know which part you are dealing with. People use bumper, bumper cover, and fascia interchangeably, and so does every parts counter, but knowing the vocabulary makes the manual readable.
- Bumper cover (also called the fascia): the painted plastic outer skin you can see. Most of this guide is about this piece.
- Air dam: the lower valance below the cover that hangs close to the ground. On many cars it is a separate piece that comes off first.
- Impact absorber (impact strip): the foam or metal beam bolted behind the cover. It usually stays on the car.
- Reinforcement bar (crash bar): the steel structure behind the cover that ties to the frame rails. It also usually stays on.
- Bumper protector: a bolt-on guard or accessory bar, not part of the cover, with its own fasteners.
Here is how long the job realistically takes.
| Job | Time for a beginner | Difficulty | Notes |
|---|---|---|---|
| Front bumper cover | 45-90 minutes | Easy to moderate | Usually the most wiring, parking sensors and fog lights |
| Rear bumper cover | 40-90 minutes | Easy to moderate | License plate, exhaust and fuel filler access on some cars |
| Reinstall and alignment | 20-40 minutes | Moderate | Goes fast once every clip and hole lines up |
| Body shop does the whole job | Several hours plus paint | N/A | Their rate is the main reason people do it at home |
Table of Contents
- What You Need
- Prep the Vehicle
- Step-by-Step: How to Remove a Bumper Cover
- Common Mistakes
- Frequently Asked Questions
- Do I need to remove the wheel to remove a bumper cover?
- What tools are best for removing a plastic bumper cover?
- How do I remove a bumper cover without breaking its clips?
- What should I do if a parking sensor connector will not release?
- Can I remove and reinstall the same bumper cover?
- Why does the bumper cover not line up after installation?
- Conclusion
What You Need
You do not need specialty tools. Almost everything on this job is a socket, a driver, and something flat to pop clips with.
- Socket set with 7mm, 8mm, and 10mm, plus a ratchet and a short extension for reaching under the car.
- Phillips and Torx bits for the fasteners that sit directly behind the cover. T20 and T25 cover a lot of cars.
- Plastic pry tool or trim clip removal tool. Never a flat metal screwdriver for prying; that is how paint gets chipped.
- Flat-blade screwdriver for the push-pin retainers that have a slot you can wedge under.
- Socket wrench or wheel socket set if the cover comes off over the tire on your car.
- A pair of needle-nose pliers for parking sensor leads that clip into the back of the cover.
- Gloves, ideally cut-resistant. Bumper covers have sharp internal ribs and the wheel house liner edges are worse.
- Safety glasses and a work light. Most fasteners sit in shadow behind the panel.
- A drop cloth or blanket. The cover is wide, flexible, and expensive to replace.
- A small parts tray or magnetic mat. For every screw, clip, and bolt. Ziplock bags labelled by location also work.
- Replacement push-pin retainers and U-clips in the sizes your car uses. These are the cheap consumables that turn one trip into two.
A clip removal tool looks like a tiny fork or flat blade with a notch. You slide it under the head of the retainer and lift. Side cutters work as a last resort, forum advice aside, but do not squeeze them shut or you will shear the clip and leave the stud stuck in the plastic.
Your owner’s manual tells you where the emergency release and jack points are, and for wheel removal, our guide to how to remove a stripped lug nut without damage covers the case where a wheel nut fights back.
Prep the Vehicle
- Find the bumper cover removal section for your exact year, make, and model in the owner’s manual or a service manual subscription. Fastener layouts change between model years even on the same car.
- Park on level ground, in gear or in park, with the parking brake set. Engine off.
- Turn the front wheels toward one side to open up the wheel well area where the cover wraps around.
- Disconnect the negative battery cable if the manual calls for it, or if you are unplugging sensors and cameras. Do it before you start reaching behind panels.
- Work in daylight or set up a work light. Count the screws in each area before you remove any, then label the tray.
The battery step is a judgment call. Short sensor leads usually unplug without it, but a car with a camera or ADAS module mounted in the cover is happier with the battery isolated, and a disconnected battery avoids a fault code if you leave the car open for a few hours.
Step-by-Step: How to Remove a Bumper Cover
How to Prepare the Vehicle and Identify Fasteners
Start by identifying every fastener before you touch one. From the front of the car, look for fasteners along the top edge under the hood latch or above the grille, one or two on each side above the side marker light where the cover meets the fender, a row underneath along the lower valance, and a handful inside each wheel well holding the cover to the wheel house liner.
A poster on a Cadillac forum described the side attachment in a way that matches most cars: there are two bolts on each side holding the cover to the fenders above the side marker lights. Those are the ones people miss because they are behind the marker light, not below it.
On many older cars the license plate bracket hangs off the cover itself, so there are also fasteners close to the plate, two on each side. Take a phone photo of the whole front end from two angles before you remove anything. Those photos are how you get the cover back on correctly later.
Sort fasteners into groups as you go, not at the end. Screw lengths vary, and a long screw in a short hole bottoms out and cracks the plastic.
Remove the Wheel or Access the Bumper Edge
Two approaches show up depending on the car. On many models you only peel the wheel house liner back and pull the screws holding it to the cover, usually two or three small screws per side. On others the cover edge runs under the tire, and you have to loosen the wheel, either a full removal on older designs or a turn-and-loosen on most newer ones.
If your manual says to remove the wheel, support the car properly on jack stands or a rated ramp. If it only says to loosen the lug nuts, turn the wheel toward the passenger side and back the lug nuts off a couple of turns, leaving them in place.
Now the important bit: not every screw back there belongs to the bumper. The wheel house liner screws hold the liner to the body and often to the cover. Suspension components, splash shields, and the mud flap studs sit in the same neighborhood. Only take out what the manual lists, and if you are unsure, trace what the fastener holds before you turn it.
A service-manual forum answer for a Porsche 992 described the job accurately: lots of fasteners, nothing particularly tricky about the procedure. The volume of hardware is what makes it feel harder than it is.
Release the Upper Tabs and Side Clips
With the top and side fasteners out, the cover is held by plastic retainers along its top edge, around the grille opening, and down both sides near the wheel arch. These pop out with light pressure, not force.
Slide your plastic pry tool under the retainer head and lift gently, working from the corners toward the center. Park the cover on the blanket as soon as it starts to bow outward, so the weight of the panel never pulls on a clip you have not released yet.
On a car where the grille is part of the cover, the grille often uses the same retainers along its lower edge and releases as the cover comes away. On cars with a separate grille, the grille usually stays on the car or comes off separately, which is a different procedure with its own fasteners. The same goes for headlights. Check your manual before assuming either has to come out first, because on many vehicles the cover clears both without removing them.
Protect the paint. Put a thin piece of tape over any edge where the cover meets a fender, and never lever a metal screwdriver between two painted panels. If a retainer resists, stop and look for the fastener behind it rather than adding force.
Disconnect Sensors, Wiring, and Retaining Tethers
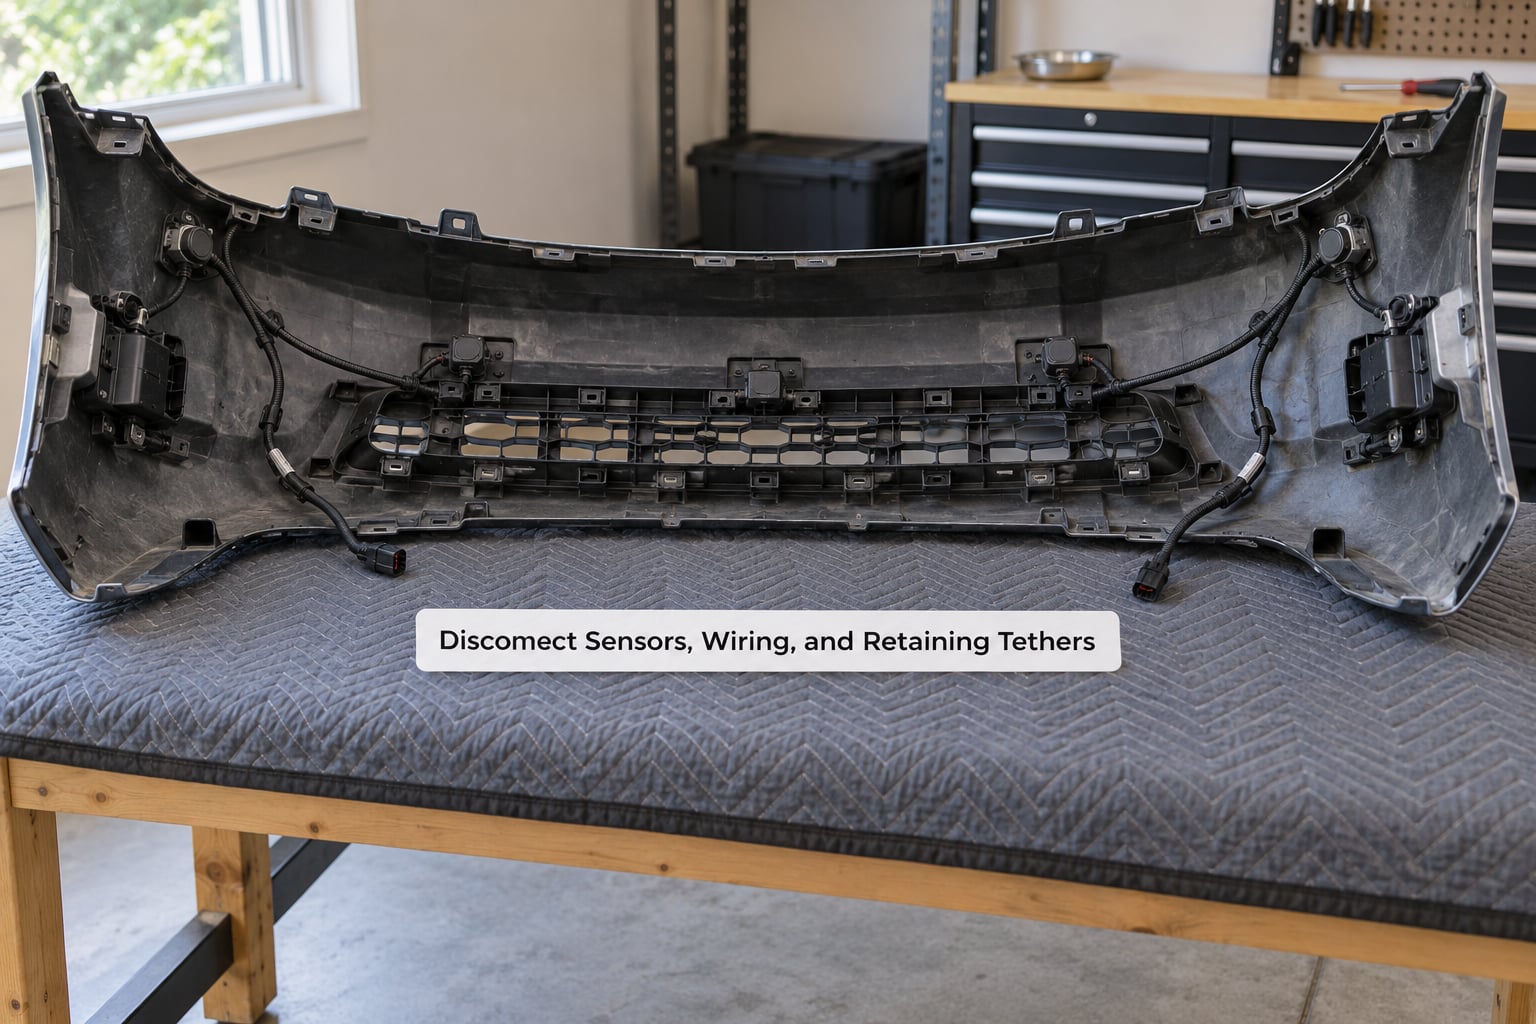
This is the step that catches people. The cover rarely comes away as one clean piece because something is plugged into the back of it. Before the cover moves more than an inch, work through this list:
- Fog light connectors, usually small black plugs that need a tab depressed before they slide out.
- Parking sensor leads, thin leads that push into a grommet or clip into the back of the cover. They are the easiest to tear.
- The ambient temperature sensor, a small bulb on a short wire behind the grille on many cars. It looks like a cheap bulb and costs little to replace once damaged.
- A rear camera or ADAS connector on cars that mount the module in the cover.
- Side marker light leads on models where the marker is part of the cover.
- Hidden retainers or tethers, low on the inside of the cover, that stop the panel from swinging out and falling.
Release the connector latch before pulling. Never pull on the wire itself, and give the plug a gentle twist as you draw it back rather than a straight yank.
Then support the cover before it drops. One owner’s write-up suggested jacking the car up high enough to lower the cover onto a blanket rather than hold it. That is the right instinct: once the last tether is free, the cover is loose and will fall outward, often taking a fender edge with it.
The impact absorber and reinforcement bar behind the cover usually stay bolted to the car. Leave them alone unless your manual says otherwise. If stainless or chrome trim sits on the cover, note how it is retained before you lift the panel off, since those pieces usually go back on last.
How to Remove the Bumper Cover Without Breaking It
Take it off from the corners, not the middle. Lift gently at both lower corners and work the panel evenly away from the fenders, alternating sides in small increments. Pulling on one edge while the other stays hooked is exactly how a corner tab snaps off.
If it will not budge, do not add force. Walk the perimeter again and check for one of these:
- A retainer you released halfway and left engaged.
- A screw hidden behind the license plate, the tow hook cover, or inside a trim piece.
- A wiring harness still clipped to the fender rather than the cover.
- A U-clip or screw in the wheel well you missed because the liner was folded back instead of fully removed.
- Ambient temperature between the panels, which on a cold morning can freeze the seam shut. Warm the car first rather than prying a frozen edge.
Set the cover face up on the blanket, not on its back. A back-first landing bends the upper tabs out of alignment, and you will be fighting that misalignment on the way back in.
Before reinstalling, inspect the work: look into each mounting hole on the car and check that the screw holes are not elongated or stripped, look at every tab and retainer on the cover, and confirm the plug ends of the wiring are intact. A quick flashlight check now saves an hour later.
How to Put the Bumper Cover Back On
Reinstall in the reverse order you removed it, and treat the first two clips as the ones that matter. Getting the cover to sit evenly is about the top and side tabs engaging before anything else, because once those are in, the rest of the panel follows.
- Align the cover so every hole and slot lines up with its fastener before you push anything. Hold it loosely with tape or hand pressure so it cannot fall.
- Start the top screws finger-tight, near the grille and at both corners. They hold the cover while you work down.
- For each push-in retainer, press in and up at the same time. That upward pressure matches the angle of the tab and lets it clear the lip instead of fighting it.
- Work from the center outward to the corners, alternating sides.
- Reconnect fog light connectors, sensor leads, the ambient temperature sensor, and the camera plug before the panel is fully tightened, so you are not reaching behind a fastened bumper.
- Install the wheel house liner, wheel, and any trim you removed.
- Tighten the side bolts above the side markers, the license plate fasteners, and the lower valance bolts to the torque your manual gives. Do not use impact tools on cover screws.
- Step back and check the gap all the way around. An even gap means the clips seated. A bulged or proud corner means one did not.
When the cover resists going back on, the fix is usually mechanical, not forceful. Bend a flattened clip back to its original angle, pry the seam slightly to clear the tab, and push in and up together. That sequence is what owners in a Civic forum landed on, and it works because the problem is geometry, not strength.
Common Mistakes
Each of these is avoidable and each one costs a clip or a cover.
- Prying with a metal screwdriver. It chips paint and leaves a bright scar exactly where the eye goes. Use a plastic pry tool and put tape on the seam.
- Pulling before the last fastener is out. Hidden screws sit above the side marker light, behind the license plate, and low inside the wheel well. If the cover resists, it is telling you something is still attached.
- Throwing away the retainers. Push-pin fasteners are reusable two or three times before the legs snap, but a reused one may not hold like a new one. Replace them as a habit.
- Losing hardware. Use a magnetic mat or labelled bags. Missing liner screws are a top cause of a rattling reinstall.
- Forgetting the connectors. Park the car with the panel off and something will eventually short, throw a light out, or hold a sensor fault. Reconnect before the last screws go in.
- Forcing frozen or seized fasteners. Penetrating oil, a longer breaker bar, and heat beat force every time. A snapped 10mm head turns a one-hour job into a recovery mission.
- Cutting retainers with side cutters. The clip head shears and the stud stays in the cover, which means drilling or a broken panel later.
- Crushing the corners. Work both sides evenly and support the panel as it separates.
On broken tabs, you have three practical options. A universal retainer or bumper repair plate clips or screws over the broken mount and is the quick fix. A plastic welding kit, which owners on a Genesis Coupe forum repeatedly recommend, melts new plastic onto the panel and gives you a tab to rebuild. Adhesive repair kits exist but only work well if the clip surface is cleaned and the bumper is flexed through its normal travel afterward, which is usually too little for a panel that sees vibration.
Before paint work, clean the cover properly. Our guide on how to remove bug splatter from a front bumper covers softening and lifting the residue without gouging the plastic, and how to remove a dent without paint damage is worth reading before you decide the cover needs more than a clip.
A shop is the better call if the cover is already cracked, if the mounting holes in the car are stripped, if a rail or bracket is bent from a collision, or if you need a paint match. Those turn a Saturday job into a body shop job, and the paint is the expensive part either way.
Frequently Asked Questions
Do I need to remove the wheel to remove a bumper cover?
Usually not. Most cars only need the wheel house liner peeled back so you can reach the screws attaching the cover inside the wheel well. Some older designs wrap the cover over the tire, and those require loosening or removing the wheel. Check your manual for your model year, and turn the wheels toward the passenger side to open up the workspace if the liner alone gives you enough access.
What tools are best for removing a plastic bumper cover?
A socket set with 7mm, 8mm, and 10mm, a ratchet with a short extension, Phillips and Torx bits, a plastic trim clip removal tool, and a flat-blade screwdriver cover almost every car. Add a work light, gloves, and a drop cloth. The plastic pry tool matters most: it releases retainers without chipping the paint on the fender or the cover edge.
How do I remove a bumper cover without breaking its clips?
Release every fastener before you pull. Lift gently at both lower corners and work the panel evenly away from the fenders instead of levering on one edge, because a hooked tab on the other side takes the full load. Slip a plastic pry tool under each retainer head and lift slowly. When the panel stops moving, something is still attached, so go back and look rather than pulling harder.
What should I do if a parking sensor connector will not release?
Most sensor leads either push into a grommet or snap into a clip on the back of the cover. Depress the locking tab with a small pick or thin blade before pulling, and twist the connector as you draw it straight back rather than yanking on the wire. If it still resists, work the harness back and forth gently at the base. Never lever on the lead itself, because it tears at the sensor end, which is the expensive part.
Can I remove and reinstall the same bumper cover?
Yes, on most cars, provided the tabs, retainers, and mounting holes survive. The cover is designed to come off and go back on. If a retainer snapped off or a tab cracked, replace or repair that mount before reassembly, because a bumper held on by one fewer clip will sit proud at that corner and can rattle. Keep every fastener and put them back in the same locations.
Why does the bumper cover not line up after installation?
Nine times out of ten it is a retainer that did not seat or a tab that is bent. Start the top screws first, then press each clip in and up at the same time so the tab clears the lip, working from the center out to the corners. If the panel still will not sit, a flattened retainer can often be bent back to its original angle with pliers. A stretched hole in the plastic means that mount needs a repair plate.
Conclusion
Find the model-specific procedure first, then work in the same order every time: top, sides, underneath, wheel wells, wiring, and only then lift the panel off. Start with the least damaging fastener, use plastic pry tools at every seam, and account for each clip and screw as it comes off.
Before you call it done, walk the cover and the car: every retainer seated, no tab bent, connectors plugged back in, and an even gap all the way around. That last check is the one that decides whether the job feels finished or whether you will be back in the driveway on Sunday.