
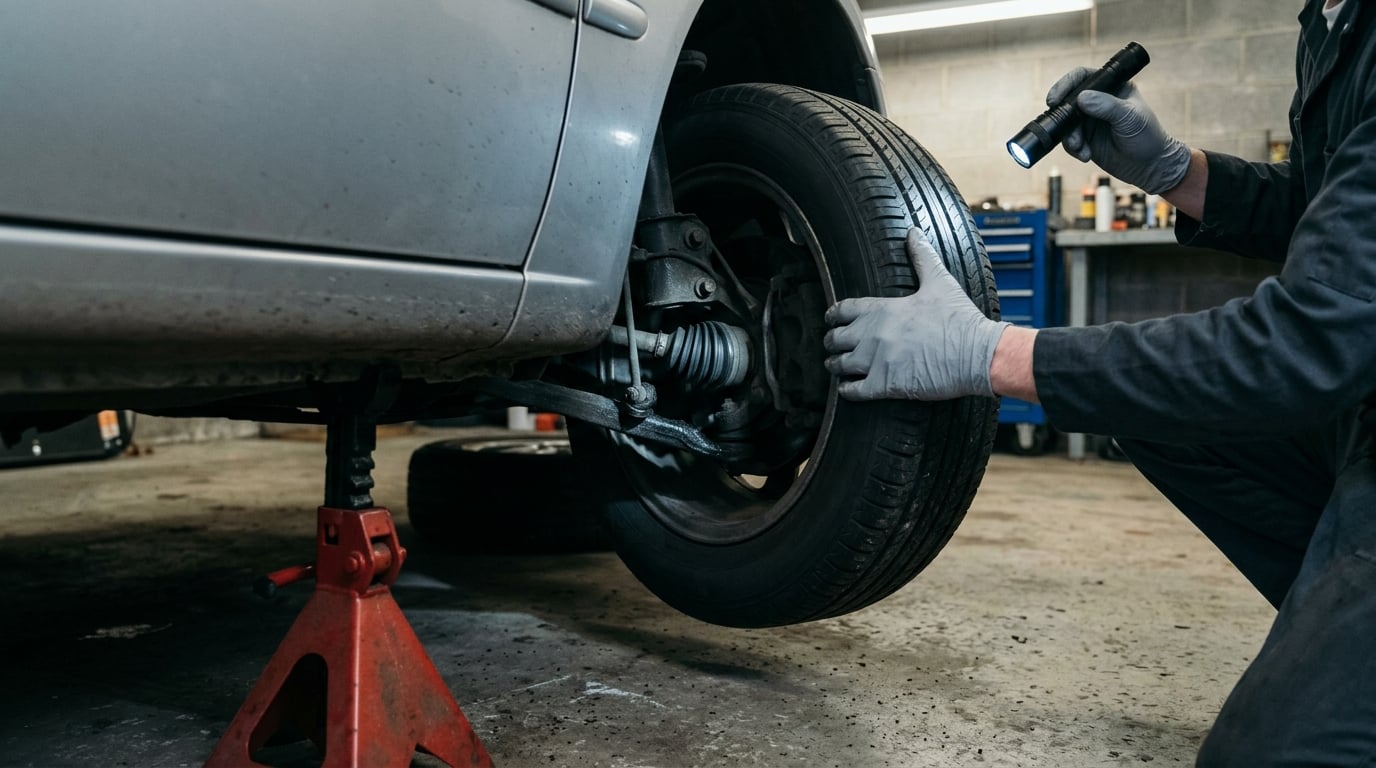
Tie rod ends should not move at all under your hands. To check them for play, put the car on jack stands, grab the tire at the 9 and 3 o’clock positions, and rock it side to side. Any perceptible shift at the joint means the part is worn, and the federal inspection limit allows no more than one-quarter inch of free play in the steering linkage.
That check takes about fifteen minutes once the car is up, and it tells you more about your front end than any amount of guessing from the driver’s seat. The confusing part for most people is that play shows up differently with the wheels on the ground and with them hanging in the air, so both tests matter. Here’s the order I use, the way I read what I find, and where people go wrong.
Table of Contents
What You Need
Grab your owner’s manual and read the lift points and the steering torque specs before anything else. The manual is the difference between a safe afternoon and a bent pinch weld.
- Jack stands rated for your vehicle’s weight, plus a floor jack to get it up there
- Wheel chocks, and level ground you can trust
- A flashlight or headlamp, because the interesting parts sit in shadow
- A pry bar or flat screwdriver for checking bushing and boot condition by feel
- A wrench and socket set for the outer tie rod jam nut, if you go on to measure anything
- Clean rags and a marker so you can note which side you found play on
- Penetrating oil, sprayed ahead of time on any hardware that looks rusty
Park on level ground, engine off, transmission in park with the parking brake set, and chock the wheel diagonally opposite the one you’re lifting. The car needs to rest fully on the stands, not on the jack, before you put a shoulder into a tire. While you have the front end apart, it’s a good moment to run through the rest of your fluid checks the same way we cover in how to check for engine oil sludge in your BMW.
Step-by-Step
How to Check Tie Rod Ends for Play at the Wheel
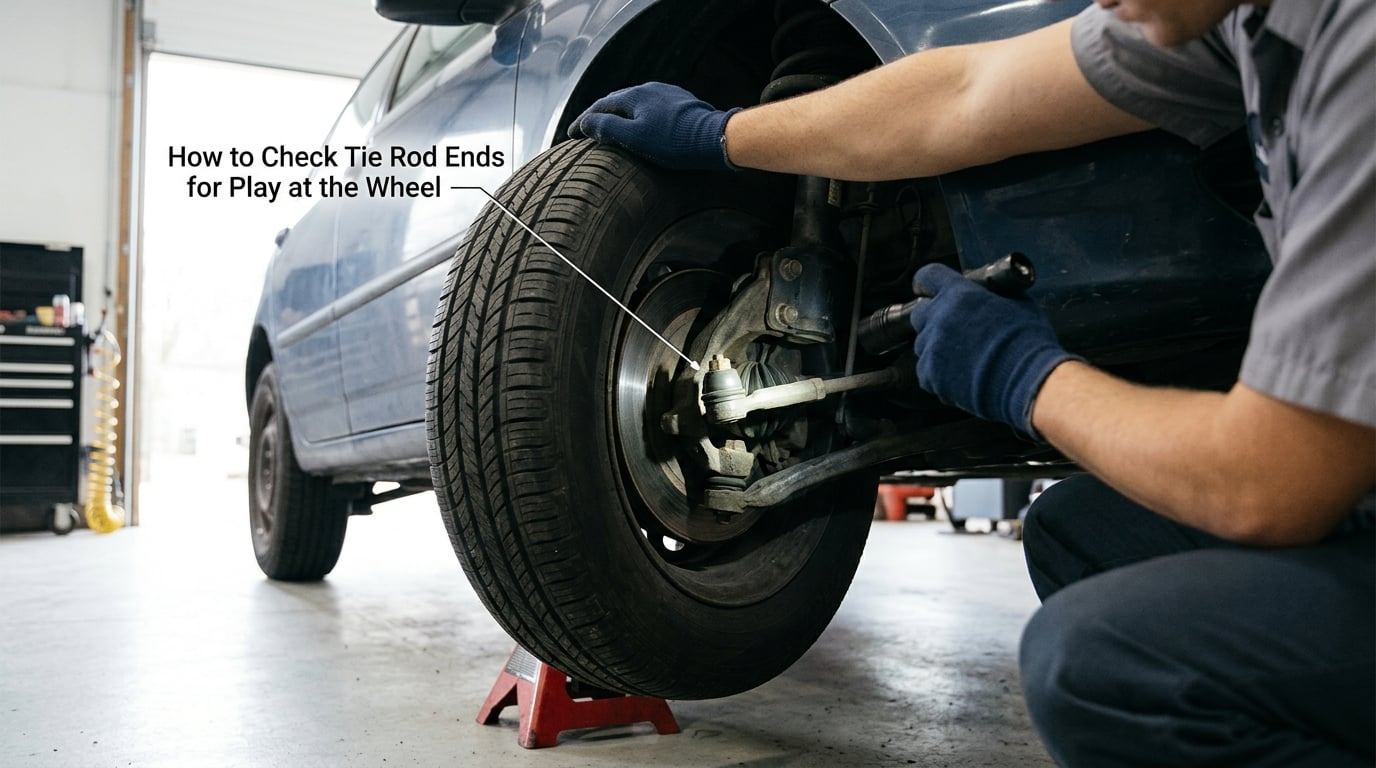
This is the core move: with the wheel supported and hanging, place both hands on the tire at 9 and 3 o’clock, thumbs pointing up, and push and pull it fore and aft. What you’re feeling for is movement between the tire and the steering knuckle at the outer tie rod stud, not the small rubbery give of the tire itself.
A good joint feels like a solid, dead connection. A worn one lets the tire shift, often with a dull knock as the ball stud taps the inside of its socket. If you have to ask yourself whether you felt something, you probably did, and the joint is going.
Then repeat the rock at 12 and 6 o’clock. Play here that wasn’t there at 9 and 3 points somewhere other than the steering linkage, most often the lower ball joint, a control arm bushing or the wheel bearing. That distinction saves people from replacing a tie rod that was never the problem.
You’ll also do this test with the tires on the ground, engine running, wheels straight and locked. The loaded check squeezes the suspension under its own weight, which closes the gap in a dry joint and shows play that a hanging-wheel test can hide. If it feels tight in the air and sloppy on the ground, the loaded test is telling you something the unloaded one couldn’t.
Inspect the Tie Rod End Boot and Housing
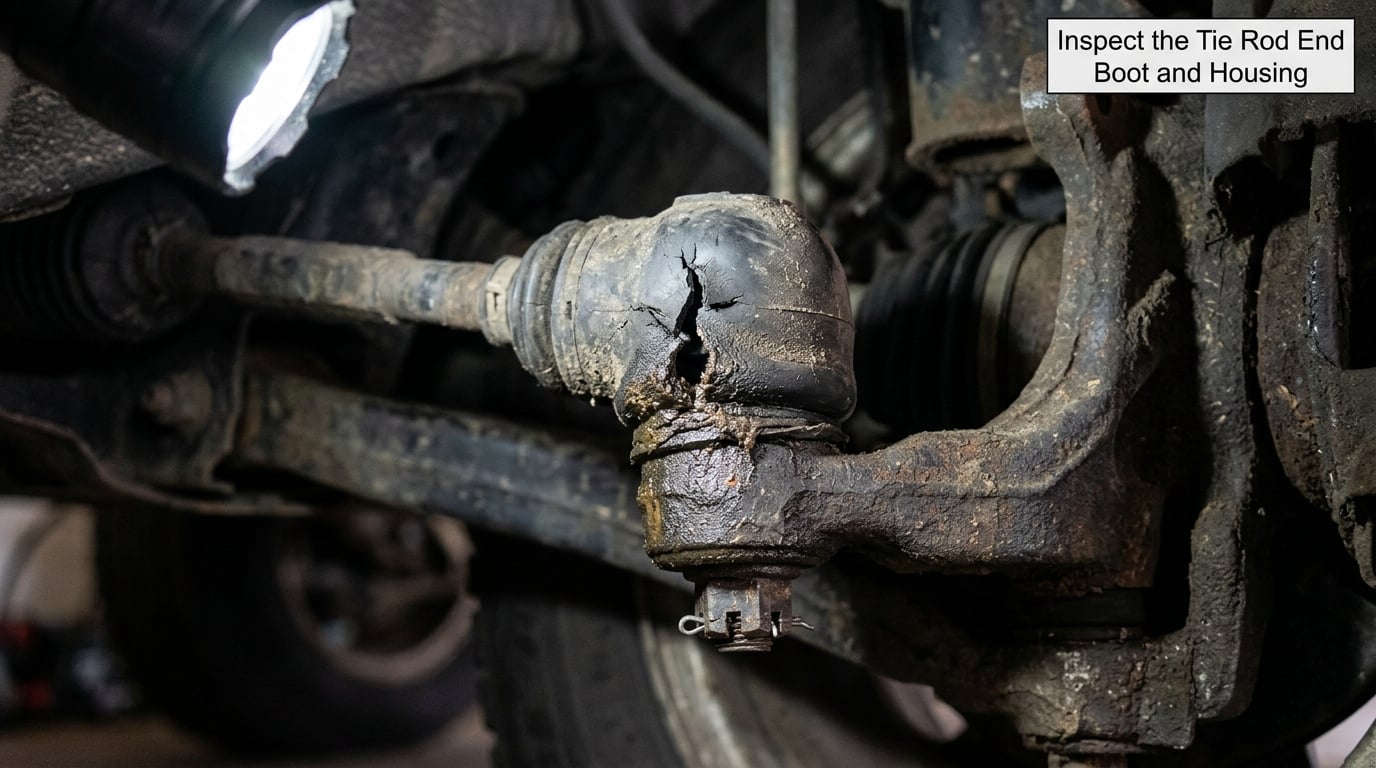
The rubber dust boot is the cheapest early warning you’ll get. Look for cracking, a split, a section that has peeled back, rubber that has gone stiff and shiny, or grease that has squeezed out and dried on the housing.
Press the tire and watch the boot while you do it. A torn boot no longer seals the joint, and the grit that gets in there does the same work as sandpaper on the ball and socket. A boot that looks fine on the outside can still be split at the thin spot where the rubber folds over the housing, so feel along the whole fold with a gloved finger.
Check the housing too. Rust bleeding from the stud threads, rust rings, or a painted-over ball stud all point to moisture getting in. A grease fitting on the boot means the joint is serviceable, but a boot that is torn on a fitted joint still means replacing the joint rather than just pumping it full of grease.
Check the Inner Tie Rod and Locking Hardware
Now work inward. Find the point where the inner tie rod screws into the rack, usually near the driver’s side, and look for play along the axis of the rod itself. Turn the wheel slightly one way, then the other, while watching the rod and the rack housing; movement there is axial play in the inner joint or in the rack bushings, not the outer end.
There’s a trick for telling those two apart. If the play follows the wheel as you steer, it’s the inner tie rod. If it stays put no matter where the wheel is turned, it’s the rack bushing, and that’s a different job with a different part list. Several owners on r/AskAMechanic chase exactly this after a rack replacement, and the steering-wheel-off-center symptom that follows usually points back at the inner joint.
Look at the hardware while you’re there: the jam nut, the castle nut, the cotter pin, and any pinch bolt or clamp where the rod enters the rack. Rust streaks on the threads, damaged or stripped threads, a missing or bent cotter pin, or a cotter pin that was reinstalled backwards all mean someone has been in there. Don’t tighten any of it blind to see if the noise stops, and don’t replace a locking fastener with a plain nut.
One more thing worth knowing before you ever take one apart: many of these studs are torque-to-yield. On vehicles with aluminum knuckles they go in dry, never reused, and they get one proper torque spec from the manual. Lubricating them or bolting a used one back in is how a fresh repair ends up loose again in a month.
Distinguish Steering Noise from Normal Free Play
Clunking over bumps, railroad tracks, or expansion joints at low speed is the classic worn-tie-rod sound, and it tends to repeat at the same spot every time. A knock that only happens mid-turn is often the inner joint or a sway bar link instead.
Continuous squeaking or scraping is a different story. That usually comes from a dry ball joint, a boot dragging on something, or a wheel bearing, and it will not go away by replacing a tie rod. Tire wear gives you a clue too: feathering across the tread face or a fast wear rate on the inner edge of the front tire is a toe problem, and play in the linkage is one cause of it.
Stop the test if you find substantial movement, a badly torn boot, exposed joint internals or rust that’s already deformed the hardware. At that point a road test to “see what it sounds like” adds nothing, and driving hard on a joint that’s already loose is how a repairable part becomes a road hazard.
Confirm Wear and Know When to Replace the Part
Once you suspect wear, confirm it with a measurement rather than a feeling. A metal ruler or a tape measure against the tire tread, with a helper rocking it, gives you a number. One-eighth inch is where most drivers start noticing something is off; the federal inspection threshold for free play in the steering linkage is one-quarter inch, and that is a ceiling, not a target.
Replace the part when any of these are true: visible movement at the joint, a torn or missing boot, loose or missing locking hardware, rust damage to the stud or housing, or a steering feel that changes as the wheel moves. A torn boot on its own is enough. It will not seal again, and it turns a small money fix into a seized joint later.
Replacing a tie rod changes toe, and toe is an alignment setting. Get the alignment checked and corrected after the work, whether you did the replacement yourself or a shop did it. The same goes for any part of the linkage you touch while it’s apart.
Here’s how to read what you find, in one place:
| What you see | Where you feel it | Most likely part |
|---|---|---|
| Knock or shift at 9 and 3 o’clock | Tire to knuckle, wheels hanging | Outer tie rod end |
| Knock or shift at 12 and 6 o’clock | Tire to knuckle, wheels hanging | Lower ball joint, control arm bushing or wheel bearing |
| Play tight in the air, sloppy on the ground | Loaded test, engine running | Worn bushing or joint that needs load to show |
| Play that follows the wheel while steering | Along the axis of the rack rod | Inner tie rod |
| Play that stays put as you steer | Where the rack enters its housing | Rack bushing |
| Clunk over bumps only | Front end, low speed | Tie rod or ball joint |
| Knock only while turning | Front end, mid-turn | Inner tie rod or sway bar link |
Common Mistakes
The most common error is doing the whole inspection with the car unsupported, on the jack, or worse with the car on the ground and the engine running and the wheel still on. Load changes the result in both directions, and the reading means nothing.
Second is blaming the tie rod for play that belongs somewhere else. If the movement shows up at 12 and 6 but not at 9 and 3, the steering linkage is innocent, and replacing a tie rod there is an expensive way to fix nothing.
Third, treating normal steering free play as a failed joint. Every steering system has a small amount of lash by design, so a dead spot straight ahead that disappears a few degrees off center is normal, not a worn part.
Fourth, skipping the inner tie rod because the outer end checked out. Plenty of cars have an outer end that’s fine and an inner one that’s gone, and the outer test will never show it.
Fifth, tightening the wrong fastener. A jam nut left loose, or a torque-to-yield stud tightened to the wrong value or into a lubricated hole, undoes the repair. If you have a torque wrench and the manual figure, use them.
Sixth, using a pry bar or water pump pliers to get leverage on a joint you’re only inspecting. It works, and it also bends ball studs and cracks housings you’ll be replacing next month. If you need a separator to take the joint off, that’s a removal job, not an inspection job.
Seventh, and most dangerous, continuing to drive with a damaged boot or a loose joint while you shop for parts. Get the car supported, inspect both outer and both inner joints, and if the play is real, arrange the repair rather than another few miles of commuting. While the front corner is apart, checking the brakes at the same time is a good use of the same lift, as we cover in how to check brake calipers for leaks.
Frequently Asked Questions
Is it safe to drive with a torn tie rod end boot?
A torn boot does not by itself mean the joint has already failed, but it is the reason to schedule replacement promptly. Once the seal is open, grit and water get onto the ball and socket and wear it faster. If you also feel play at 9 and 3 o’clock, treat it as a safety item and drive gently to a shop rather than continuing normal use until it gets worse.
How much play is acceptable in tie rod ends?
Federal inspection rules cap free play in the steering linkage at one-quarter inch, but that is a legal ceiling rather than a healthy measurement. Most drivers notice something around one-eighth inch. A new joint should feel solid, with no perceptible movement and no knock. If you need a ruler to decide whether you felt something, replace it.
How do I check tie rods without lifting the car?
Park on level ground, set the parking brake, then grip the tire at 9 and 3 o’clock and rock it side to side with the engine running and the wheels straight. That loaded test squeezes the suspension under its own weight and can reveal play a hanging-wheel check misses. It will not tell you about a torn boot, so pair it with a flashlight and a visual look at the joint.
What does a clunking sound from the front end mean?
A clunk that repeats over bumps, potholes and expansion joints at low speed usually points to a worn tie rod or lower ball joint. A knock that only appears while the wheel is turned mid-corner is more often the inner tie rod or a sway bar link. Continuous squeaking or scraping suggests a dry ball joint or bearing instead. Confirm with the 9 and 3 versus 12 and 6 tests before buying anything.
Do I need an alignment after replacing tie rod ends?
Yes, and it is not optional. A tie rod sets toe, so removing one and installing a new one changes the setting even if the old part is put back on. Skipping the alignment wears the front tires unevenly and can leave the steering wheel off center. Have the alignment checked and corrected after the repair, using the factory specification for your vehicle.
Conclusion
Put the car on properly rated stands, chock the opposite wheel, and rock each front tire at 9 and 3 o’clock. Any perceptible movement at the joint, a torn boot, or loose hardware means a professional inspection and a proper repair, not another month of putting it off. Then have the alignment checked once the work is done, because the tie rod sets toe and the tire depends on it.